
Although it has been around for decades, stock refrigerators that came with your RV have a lot of shortfalls. The interior volume is quite limited while it needs to be level when it is in operation.
Thanks to the introduction of residential refrigerators in RV, people no longer have to deal with crystallization in their cooling coil and limited storage space.
These full residential reefers were already in use on “all-electric” builds and high tiered coaches. The units need additional inverters and batteries to supply the extra load of off-grid electricity. The residential refrigerator in RV is a lot more efficient, and it requires lesser power to be able to operate.
These units are widely lauded for consuming only about one-third of the total power consumption on a daily basis. No wonder there is growing popularity in the use of these residential refrigerators.
Using this has offered so many advantages to the users of the type of absorption. It has far more interior space, is not at all level sensitive and has become a lot more affordable to replace as compared to the higher-priced units.
The cooling accuracy and temperature precision are also a lot higher while offering all the latest features of a residential fridge.
If you are planning to get yourself a Recreation Vehicle, you should not rule out the possibility of getting a residential fridge. What’s the point of an RV without chilled beer and an unlimited supply of good food right?
If you already have an RV, but you only have a stock unit, you must join the many others by upgrading to the latest residential model. Of course, much of it will depend on the application in your RV.

Remember to also add the right sized inverter and also a battery bank if required. It is pretty simple, and for most people, it is more of a DIY project in their spare time.
Before you go out and buy yourself the latest residential refrigerator, consider the list below.
The Good And The Bad

PROS
More Space – The biggest problem with stock RV units is the size. They are so small and do not hold enough food for people who live their full time are on long trips. They find themselves visiting the grocery store over and over again every few days which can be a huge problem.
On the other hand, a residential refrigerator in RV is a lot bigger. Even though it has the same exterior size as the stock unit, the interior is comparatively a lot bigger and hence offers more space. This is simply because more components are needed for RV refrigerators to function. These components consume the space that could otherwise be used in storing food.
Better Cooling – Better cooling is one of the biggest benefits of investing in a residential refrigerator. We all know absorption units do not cool as well. Your refrigerator will lose its cool if you park your RV in the wrong direction or rides up too high in the mountains.
Less Maintenance – Stock units are a pain in the ass! You have, and it gets old pretty fast. The great news is, residential refrigerators do not require any such maintenance.
CONS
Boondocking – As far as disadvantages go, boondocking is quite complicated, and it could be frustrating. Since residential fridges do not come with a propane setting, it must be run only with the help of electricity. This can be quite a bit of a problem if you want to go off-grid.
The good thing is, there are different ways around it. Many RV owners use solar power and even carry around extra battery which should be just fine. Otherwise, you can always use ice chests when going off the grid with your loved ones.
So you want to install a Residential Refrigerator in your RV now what?
Installing a residential refrigerator in an RV is pretty much a straightforward process. If well planned and thought out, it usually takes a day to get done. We only need basic tools, some new parts, insulation material and preferably someone to help us with the job.
After we’ve decided a residential refrigerator in an RV is the way to go, all we need to do is go through these steps:
- Choosing a compatible new unit
- Removing the old refrigerator
- Cleaning and preparing the space
- Placing and securing the new unit
- Finishing touches
Using a residential refrigerator in an RV has some limitations, but more advantages. There’s still debate among RV owners if boondocking is practical when not using a propane-powered unit. If that is an issue for you, you may consider installing solar panels as well.
Step 1: Measure and Choose the new unit

This step basically comes down to measuring the space we have available and choosing a residential refrigerator that fits it. Apart from measuring the width, height, and depth, we have to make sure there’s enough clearance for the doors of the new unit to open. Also, we must keep in mind that on some models, the hinges stick out a bit to the side.
It is a good idea to leave some free space above the new refrigerator as well. Residential units, naturally, tend to get hot at the back and aren’t designed to be tightly enclosed. We should make some space for the air to circulate around them.
If you go for a large-sized residential refrigerator, you will have to modify the cabinet space. Most RVs have a cabinet depth of 26 by 24 inches. Find ways to add this width and height if you pick a large residential refrigerator.
We will also leave some additional space on all sides, except the bottom, for the Styrofoam insulation. Energy consumption is critical when camping, so we want our appliances to perform as efficiently as possible.
There’s a possibility of the residential refrigerator not fitting through the door of the vehicle. If that’s the case, we need to find an alternative way of getting it inside.
SELECTING THE INVERTER
The inverter is also an important component for you to keep in mind.
Find out whether your refrigerator will function on pure electric sine waves or modified sine waves (MSW). Keep in mind that some refrigerator components have a tendency to get damaged or disrupted when it is fed MSW power.
Always check the refrigerator specifications and ask the salesperson or even the manufacturer (if you can) so that you will know whether the unit will face any such problem later on.
Step 2: Removing the old unit
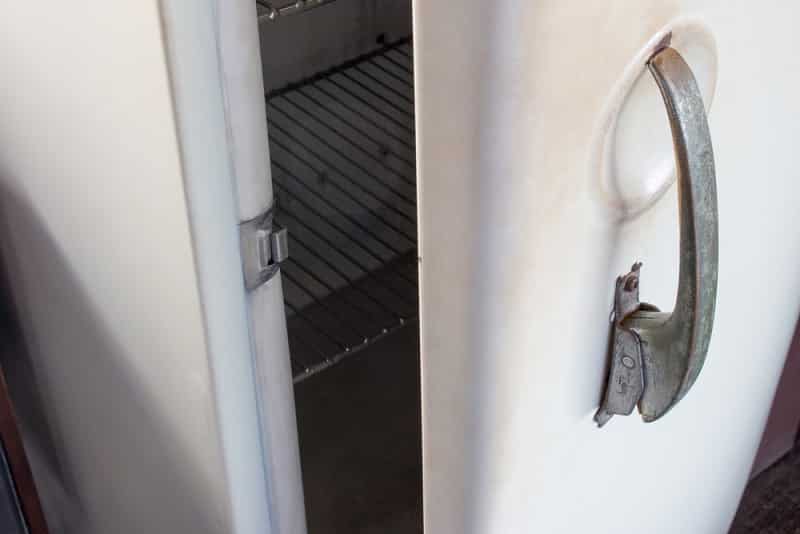
First, we have to disconnect the existing refrigerator from all the propane and/or electric lines. It’s important to plug the hole on the propane pipe where the old unit was connected! Now’s also a good time to check for any possible leaks (soap and water method). One of the advantages of all-electric refrigerators is not having to worry about propane leaks and the RV catching on fire.
Next, we’ll need to unscrew the bolts holding the old unit in place. After we’ve done that, it’s just a matter of sliding it out and carrying it out of the vehicle.
Using the door to switch refrigerators
You have to remove an old fridge to provide enough room to install your residential refrigerator in the RV. You will notice that the RV door is wide such that a small RV fridge can pass quickly. To avoid problems, measure the height and width of the old fridge against the door of your RV.
The manual has installation instructions of your old unit to guide you in finding the screws of your RV fridge. There are some screws on top of the fridge while others are concealed behind the trim piece. Do not miss out on the screws found at the bottom of the fridge.
Disconnect the propane link and tie the DC wires together. Get rid of the fuse so that you can switch off power from the wiring. If you don’t have enough space for the residential refrigerator, you can unplug the AC cord and relocate it.
You can now get some assistance from a few people to move the RV fridge. If it is a small size, it probably weighs about 200 pounds while a large fridge can be above 300 pounds.
A dolly can come in handy since it allows you to slide your fridge easily as you place the new one for installation. Ensure that you create a dolly using furniture at an appropriate height so that you don’t struggle to move the two machines.
As you set up your residential refrigerator, be careful to avoid cracking the flooring of your RV. The weight should be balanced on each side so that it does not destroy a tile on the floor.
Using the window to switch refrigerators

If the RV door is too small, you can remove the RV refrigerator through the window. You can remove the window quickly and later reinstall it. In case the windshield is the only way out, get a technician to help you remove it and fix it back once the old fridge is out of the way.
A clamp ring holds your window in position. Get rid of the screws on your window and push it as you direct it inside of your RV. Be careful while handling the window as you avoid twisting its frame since it is fragile.
Place a carpet or a heavy blanket on the edge of the window. This prevents any friction between the two surfaces so that you do not damage the frame or scratch your residential refrigerator.
You can now get rid of doors, shelves, and hinges of your old fridge that it is light enough to lift and pass from the height of your window. Get support from others such that one person pulls the front part while you hold the back. Make use of the dolly to slide the fridge and navigate it to the window’s exit.
It is time to modify your cabinet space as you prepare for the residential refrigerator. Make vital repairs such as strengthening the floor of the cabinet before securing the new cooler.
For easy placement through the window, you can pack your RV in a strategic position such that the delivery truck can access your window well to reduce vertical lifting.
Do not forget to remove parts such as the doors and interior parts of your residential refrigerator so that you can lighten the load. This also ensures that moving parts such as the doors do not get damaged in the process.
You can also secure the window using a strap so that it does not swing as you pass the new fridge through the window.
Step 3: Cleaning and preparing the space
Since we have access now, it’s a good idea to vacuum and wipe the space dedicated to the residential refrigerator. If we plan on doing any modifications to the panels (depends heavily on specific desires and ideas), we should do them first.
If our refrigerator of choice is a self-defrosting one, we want to drill a hole in the floor of the RV and connect a hose to the unit’s drain pan. That allows the water to flow out of the vehicle. Afterward, we just have to make sure we seal the contraption properly to prevent any damage.
Once we’ve cleaned all the surfaces, we can start measuring and cutting the Styrofoam (or any other insulation material) and placing it all around. We have to pay attention not to obstruct any vents. We should also plan ahead where we’ll pass the cable connecting the refrigerator to the outlet.
Any insulation is better than none, so the thickness of the Styrofoam depends on the space we have available. Styrofoam can be easily glued to the panels using construction adhesive.
It is essential for the surfaces to be clean in order for the adhesive to be effective, but once we’re done insulating the space, some additional cleaning may be required.
Step 4: Placing and securing the new unit

If all our measurements are correct, we should have no trouble fitting the residential refrigerator into the old one’s place.
Anchoring your residential refrigerator during the set-up is also important. Make sure you are close to a suitable electrical outlet that you can use to plug your new fridge as you test its functionality.
The door and shelves should go into the fridge after you have already set it up into your cabinet space.
Usually, there are some metal parts at the bottom that can be drilled through. We can then fasten the unit in place using appropriate bolts.
To further prevent the refrigerator from rocking when the RV is in motion, we can fill any voids to the side of it with excess Styrofoam. We can get a better result using a couple of L brackets and more bolts.
We also want to prevent shelves from rattling while driving. Applying thin rubber strips on the grooves where the shelves slide in is a simple and effective way to mute the noise.
To stop the doors from opening while in motion, we can use Velcro or fridge door locks. There are locks designed specifically for refrigerators in motorhomes.
In the end, we only have to connect the new unit to the outlet and, if needed, a drain hose.
Step 5: Finishing touches
The final phase is our chance to get creative. Figuring out a new look for the fridge to make it blend in with our home on wheels is important. We want it to look as nice as it is functional. Sometimes it’s as simple as putting some magnets or pictures of yourself or family.
We can consider placing trims around it, especially if we’ve cut any panels during installation. Also, vinyl wrap is a good method of aesthetically tying in the refrigerator with the interior.
After we’ve done all of the work above, one more round of cleaning is in order. We’ll have to wipe fingerprints off the refrigerator, too. They will be there once we’ve carried it inside.
After that, we’re all set to enjoy the improved functionality of a residential refrigerator in an RV comes with.

Brief and Direct to the point.
Great information when I want to remove a RV fridge. Thank you very much!
Hi,
As you suggest, we bought a residential 45L fridge for our campervan. But I was just wondering how you use bolts & screws to secure the fridge… can you just drill through?
I thought I was going to have to go allll the way to Indiana to get one of those “convert” deals where they convert your old gas/electric fridge to a basically residential style fridge. Now I can do this (or get it done – ahem) while staying right here at home. I’m all in!