Insulation Upgrade Savings Calculator
Estimate camper heat loss before and after an insulation upgrade using wall, ceiling, and floor area, old and new R-values, temperature difference, furnace efficiency, heat source, heating hours, season nights, and air leakage factor.
Heat-loss breakdown
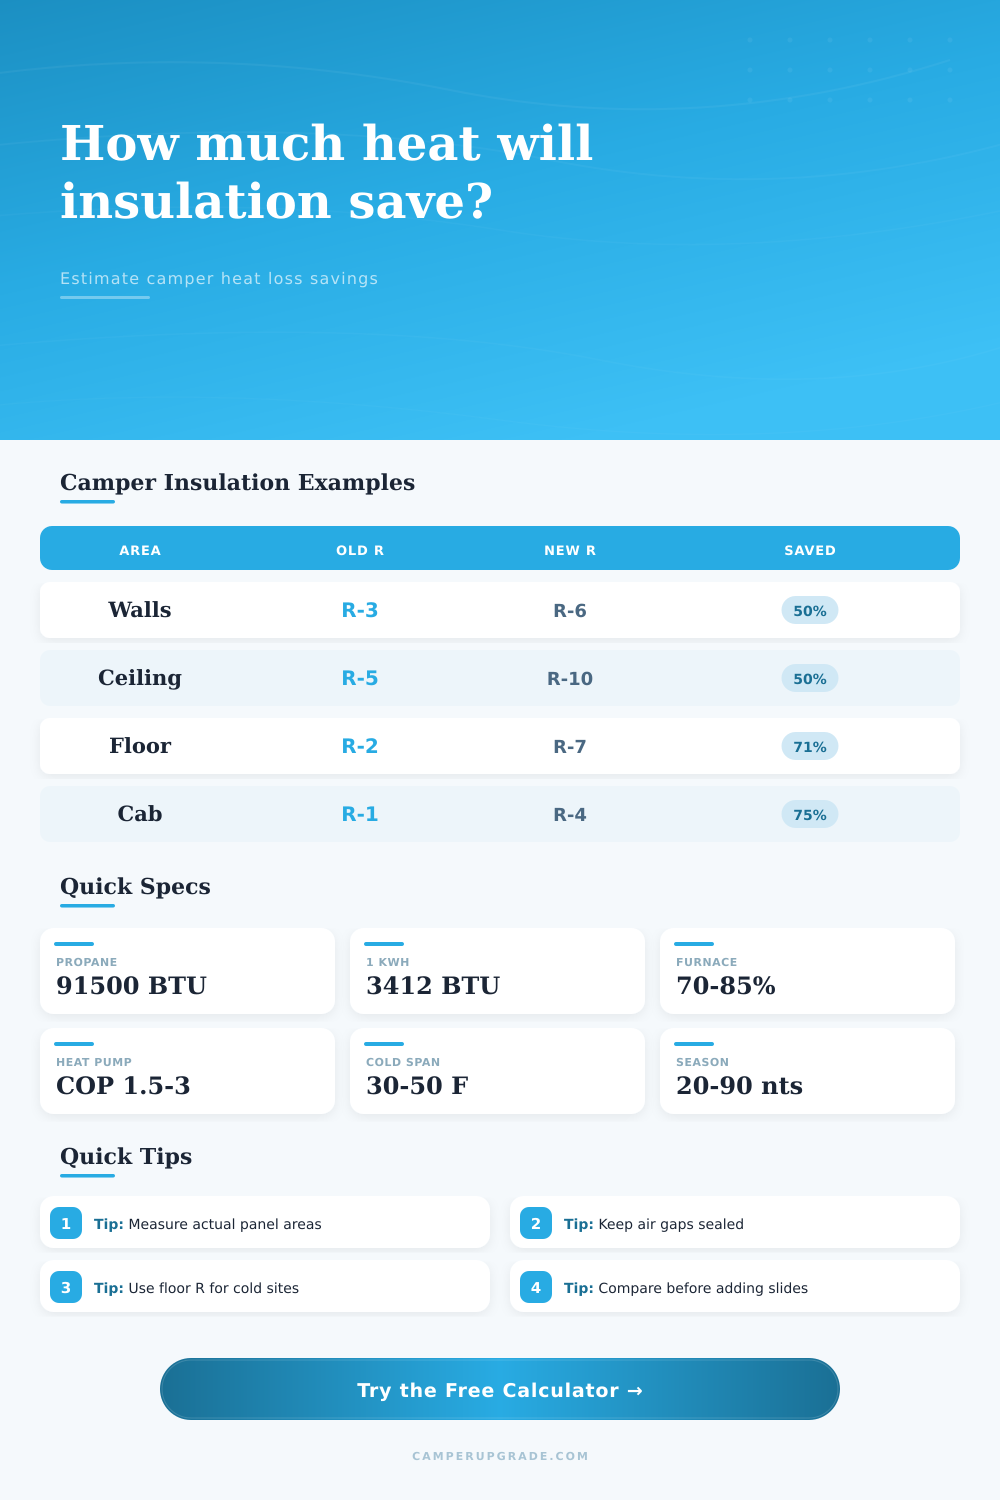
| Upgrade target | Old R | New R | Heat-flow reduction |
|---|---|---|---|
| Thin wall panel plus foam board | R-2 to R-3 | R-5 to R-7 | Often cuts conductive wall heat flow by about half. |
| Ceiling cavity with added rigid foam | R-4 to R-6 | R-9 to R-12 | High payoff because warm air collects near the roof. |
| Cold floor with foam layer or insulated mat | R-1 to R-2 | R-5 to R-8 | Large comfort improvement in frozen or windy sites. |
| Cab divider curtain or removable window inserts | R-1 | R-2 to R-4 | Reduces the effect of glass and cab air leakage. |
| Heat source | Input energy | Useful heat basis | Calculator use |
|---|---|---|---|
| Propane furnace | 91,500 BTU per gallon | Input BTU x furnace efficiency | Reports gallons saved after the entered efficiency is applied. |
| Electric resistance heater | 3,412 BTU per kWh | Nearly all electric input becomes room heat | Reports kWh saved using a 100% useful-heat basis. |
| Electric heat pump | 3,412 BTU per kWh | kWh x COP x 3,412 BTU | Use efficiency as COP x 100, such as 180 for COP 1.8. |
| Hydronic or diesel heat | Use comparable BTU data | Delivered heat depends on burner efficiency | Use propane mode as a BTU savings estimate, then convert separately. |
| Camping condition | Indoor target | Outdoor average | Delta-T to enter |
|---|---|---|---|
| Cool shoulder season night | 65 to 68°F | 42 to 50°F | Enter 15 to 25°F for a mild heat estimate. |
| Typical cold campground night | 66 to 70°F | 28 to 38°F | Enter 30 to 40°F for many winter-trip estimates. |
| Freezing and windy exposed site | 66 to 70°F | 10 to 25°F | Enter 45 to 60°F and use a higher leakage factor. |
| Parking pad storage heat | 40 to 50°F | 20 to 35°F | Enter 10 to 30°F depending on the freeze-protection setpoint. |
| Surface | Quick measurement | Include | Watch for |
|---|---|---|---|
| Walls | Perimeter x inside height | Cab walls, doors, and exposed lower panels if heated | Subtracting windows is optional if the R-value estimate already blends them. |
| Ceiling | Interior length x width | Pop-top fabric, roof hatch zones, and flat ceiling panels | Ceilings matter most because warm air pools upward. |
| Floor | Interior floor footprint | Under-bed storage floor and cab floor if heated | Wind under the chassis can make floor upgrades feel larger than the math. |
| Leakage | Use the factor selector | Doors, vents, slide seals, cab glass, and plumbing holes | Air sealing can change real savings without changing R-values. |
conductive heat loss in BTU/hr = area x delta-T / R-value for each surface.adjusted heat loss = wall + ceiling + floor heat loss, multiplied by the selected air leakage factor.season heat saved = (old adjusted BTU/hr - new adjusted BTU/hr) x heating hours per night x season nights.propane saved = delivered heat saved / furnace efficiency / 91,500; electric saved = delivered heat saved / heating efficiency / 3,412.
The camper shell is typically a thermos-with-the-lid-off type deal. When you are trying to sleep, you feel drafts. Before daylight, your propane pressure plummets. Your heater run all night long, and you think: Why?
Insulation upgrades aren’t always so obvious, math-wise. How the heat travel around your particular envelope is dependent upon a few factors, temperature difference, surface area, and the insulative resistance of whatever stands between you and cold. Knowing those factors help you decide where to spend your money instead of guessing which panel need foam.
How to Keep Your Camper Warm
After entering your dimensions and existing insulation levels into the calculator (above), it perform all the fancy math for you. It then separates out heat loss into three components: floors, walls, and ceilings.
Why? Because these surfaces is unique, and they play different roles in determining your total heating load. For example, heat rise. So if your ceiling isn’t insulated well, or at all, you have a large hole in your thermal barrier. Warm air leak through your roof quickly, triggering the furnace to run longer to compensate. The calculator compensates for this by allowing you to enter separate R-values for each area.
You’ll also notice the calculator includes air leakage as a variable. Many do-it-yourselfers overlook this, but it’s important. By sealing cracks around your doors, windows, vents and slide-outs, you can make a bigger difference than you’d think by adding another inch of foam board. Gaps around vents, doors, and slide-outs act like a sieve, allowing conditioned air to slip away. The leakage factor in the calculator takes this into consideration, showing just how much your insulation investment can be wasted by drafts.
What should you use? How do I balance weight, space, and performance?
Polyiso foam has a high R-value per inch. Rigid XPS is easy to cut and durable. Fiberglass is effective in deep cavities, but not so much if it is wet or compressed. The table on this page will help you understand which thickness of insulation will meet your target R-value, and compare materials.
If you double an existing R3 wall to an R6 wall, that halves the conductive heat flow through those walls. Sounds simple! But how do you do that in a thin van wall? It takes some thought. You can’t just go buy some insulation and slap it on there. You need to stop thermal bridges at the studs while preserving interior space.
The amount you save in fuel depends on how you heat your home: Electric resistance heaters turn nearly every watt into heat, although they get very expensive if you live where electricity is expensive; heat pumps are more efficient but become less effective when it gets really cold outside; and propane furnaces is efficient and limited in size (each gallon has about ninety-one thousand BTUs). When you choose what kind of heating system you have, this calculator converts the savings in BTUs into either kilowatt-hours of electricity or gallons of propane. That’s where the real money-saving comes into play: How much does it cost you to feel warm? If the calculator tells you that you’ll save ten gallons of propane during the entire winter, you’ll know exactly what the financial return on your upgrade will be.
And it will help you plan for colder spells: You know that your heater isn’t going to need to run as long, so you’ll be able to ration your fuel supply longer.
First: Take accurate measurements of your camper. Measure the floor, ceiling and all four walls inside. If you have sealed windows that don’t leak air, subtract their surface area. If you have leaky windows, add their surface area. Plug those measurements into the calculator.
Also plug in how much warmer or cooler than your inside temperature you expect it to get. For fall camping, it’s often a thirty degree spread. In winter, it could be as large as fifty. Remember, the delta-T (the difference between inside and out) drives the heat loss equation. A higher delta-T means more energy escapes through the same amount of insulation. Thus, a wind tunnel makes a camper feel colder than when tucked in a sheltered location. Although the R-value doesn’t change, the wind effectively makes the leakage factor bigger.
The bottom line is that insulation is a matter of comfort and control. A better shell cuts down on your operating expenses and puts less stress on your heating system. It enables you to take short trips without carrying more gas around. And with the calculator, you’ve got the numbers to make the case.
Insulate the weakest surface first, typically the floor or the ceiling, and you’ll get the biggest bang for your buck. You won’t have to battle the cold anymore; you can just enjoy it. Once the shell retains heat, that draft you noticed initially vanishes. Your heater hums softly in the background while you sleep warmly. Your fuel stretches farther.