Crampon Size Calculator
Match boot sole length, boot size, toe and heel welts, bail style, frame range, center bar setting, overhang, and front point position before you head onto snow or ice.
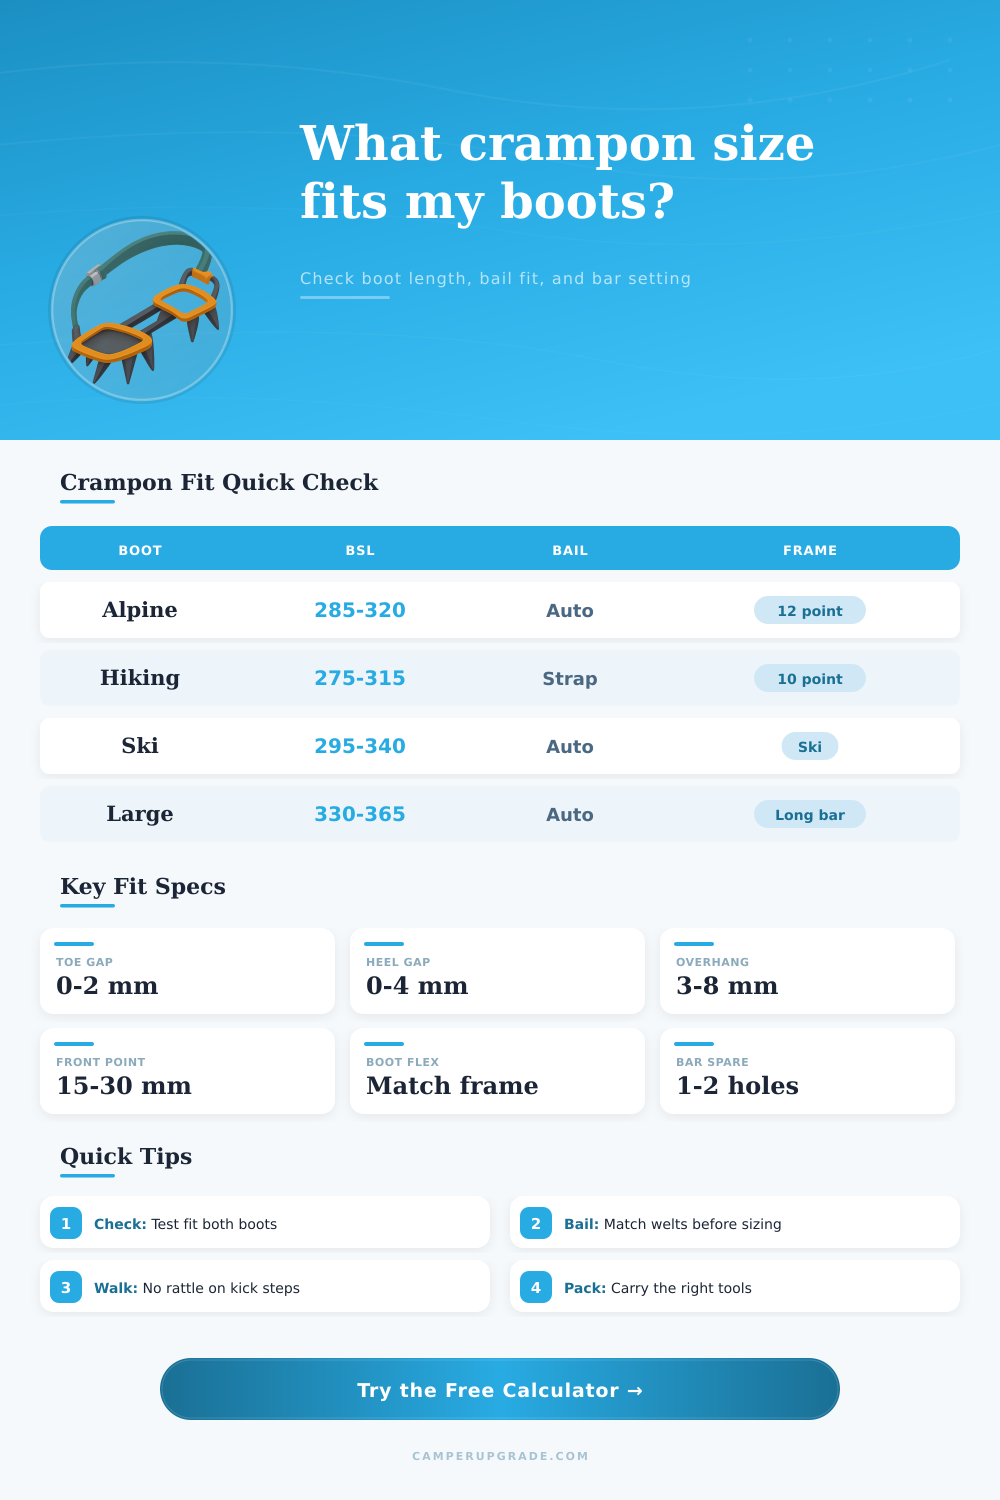
⛰Crampon Fit Presets
⚙Boot Length, Bail, and Frame Inputs
This calculator estimates fit geometry only. Always perform the manufacturer's boot compatibility check, anti-balling plate check, and a real kick-and-walk test before climbing.
📐Four Fit Formulas
Frame Range
--Boot sole length minus listed min and max decides whether the crampon needs short, standard, or long bar hardware.
Bar Hole
--Recommended hole equals rounded length offset divided by the center bar hole spacing.
Overhang
--Toe plus heel overhang flags whether the boot is sitting centered on the rails.
Point Reach
--Front point projection compares your measured toe reach against the target for the point layout.
🥾Crampon and Boot Spec Grid
📊Crampon Fit Reference Tables
| Boot Class | Flex | Best Binding | Use |
|---|---|---|---|
| B0 | Flexible | Strap only | Snow travel |
| B1 | Semi-flex | Strap or hybrid | Winter hiking |
| B2 | Stiff | Hybrid | Alpine routes |
| B3 | Rigid | Automatic | Steep ice |
| Ski | Rigid shell | Ski lever | Ski touring |
| BSL Range | Common Boot | Bar Note | Fit Check |
|---|---|---|---|
| 225-270 mm | Small boot | Compact bar | Toe centered |
| 270-310 mm | Most alpine | Standard bar | 1-3 spare holes |
| 310-350 mm | Large alpine | Near long end | Check heel rail |
| 350-390 mm | Expedition | Long bar | Full pin depth |
| Bail Type | Toe Need | Heel Need | Warning |
|---|---|---|---|
| Strap | No toe welt | No heel welt | Strap routing |
| Hybrid | Basket toe | Rear welt | Lever snap |
| Auto | Toe welt | Rear welt | Bail seating |
| Ski | Rigid toe | Rigid heel | Shell shape |
| Point Layout | Target | Best Use | Fit Note |
|---|---|---|---|
| Walking | 12-22 mm | Glacier | Short reach |
| Alpine dual | 18-30 mm | Couloirs | Balanced |
| Mono point | 25-38 mm | Ice climb | Precise toe |
| Ski points | 10-24 mm | Ski mount | Low snag |
🛠Fit Tips
Crampon fit is a necessary part of preparation for mountaineers due to the impact that the crampon fit have upon an individual’s comfort while on the mountain. A crampon that is the wrong size for an individual will lead to that individual fighting with the crampons loose hardware, and will not allow the individual to effectively maintain good control over there crampons. Such wrong size crampons may slide on the individual when they kick their crampon steps, and may create a crampon that feel pinched on the boot of the individual.
In order to ensure that the crampon fits the individual properly, there are several measurement that should be considered and taken into account. One of the measurements that should be made is the length of the sole of the boot. This length is the measurement of the area that the crampon will grip.
How to Measure and Fit Your Crampons
Most individuals will use the size of the boot as a measurement of sole length, but it is possible for two boots of the same size to have different boot sole lengths. Furthermore, a difference in sole length can impact which crampon frame is appropriate for that individual, as well as how many spare hole remain in the center bar. The crampon calculator use this length measurement to make calculations regarding the crampon fit, eliminating the need for individuals to guess at whether their crampon is too short or too long.
The second group of measurements to consider are those related to the bail type of the crampon and the stiffness of the boot. B3 crampons will allow for the use of an automatic heel lever for those of rigid boots, but softer boots may require straps instead. The individual cannot ignore the bail type if they want to ensure that their crampon will remain properly fitted into their boot, regardless of the terrain.
These types of measurement is also required to be input into the crampon size calculation to ensure that they are properly considered. Another measurement of interest is the front point projection of the crampon. This measurement ensures that the crampon will effectively engage with the ice.
If the front point projection is too small, the crampon will not effectively engage with the ice. If the crampon has too large of a projection, it will be front heavy, and may become a hazard for individuals when they walk on the ice with such crampons. The crampon calculation tool can flag such an incorrect projection to provide individuals with information regarding whether the crampon has an acceptable front point projection.
Overhang at the toe and heel of the crampon should also be measured. It is normal for individuals to have a small overhang of their boot over the crampon. Such an overhang can prevent the sole of the boot from catching on the crampon metal.
However, if there are large gaps in the overhang, this could pose a danger for the individual’s crampon to become loosen over time. Furthermore, large gaps in overhang will also prevent the crampons from being able to effectively engage with the ice. The crampon size calculation tool will add these two measurements together to determine if the crampon will be too tight, centered on the crampon, or have a high heel.
The width and bulk of the crampon should also be considered. Some individuals may have thick socks or may wear their boot within another boot. In these cases, crampons that may appear to have an appropriate size for the boot for individuals who do not wear thick socks or who do not wear an overboot may lead to the crampon feeling too tight and the heel lever not properly engage with the boot.
The individual can account for the bulk of the boot in the crampon size calculation by their input of the thickness of any socks they will wear. Despite the importance of the measurements, many individuals will make mistake when measuring their boots. For instance, some individuals may use the length of their foot rather than the length of the sole of their boot.
Using the length of the foot rather than the length of the boot sole will make the crampon size calculation incorrect. Furthermore, some individuals may believe that two boots that have the same Mondo sizes will have the same sole lengths for the boot, but this isnt always the case. It is necessary for individuals to calculate the size of their crampons based off both boots.
Another mistake that individuals can make is in the adjustment of the center bar. The individual should ensure that there is at least one spare hole in each direction of the crampon. If the individual adjusts the crampon too closely to one end, there will be no margin for error in the crampon system, if the boot compresses against the crampon at all.
The crampon size calculation tool will help to make sure that the crampon is adjusted to allow for these spare hole. In addition to the measurements, crampons may also become problematic due to the terrain that is used, as well as the temperatures at which individuals are climbing. Snow balling under the crampon, for instance, can change the way that crampons work.
Furthermore, changes in temperature can lead to changes in the flexibility of the boots of the individuals. Therefore, a final test of the crampons by taking short walks and performing kick steps on the actual terrain that is to be used can help to ensure that crampons are properly adjusted; if the crampons are rattling or shifting while performing these steps, the individual should make the adjustment to the crampon adjustment holes or the bail tension of the crampons. Finally, individuals should perform maintenance on their crampons to ensure that they are properly adjusted and functioning effective.
Ensuring that all pins are properly locked, that all straps are in good condition, and that the crampon has not shifted since being adjusted will ensure that the crampons last longer, and prevent any problems that may develop while climbing mountains of any height. By paying attention to each of these measurements and requirements for crampons, individuals will achieve an effective crampon setup.