Campsite Wind Break Length Calculator
Estimate the windbreak length, panel count, return wings, overlaps, stakes, guylines, and sheltered zone needed for tents, camp kitchens, RV awnings, beach camps, and group campsites.
🌬Wind Break Presets
📏Protected Area
The use changes comfort targets and risk notes, not the measured footprint.
Returns help with diagonal wind and swirling around panel ends.
Measure across the windward face of the tent, kitchen, awning, or seating area.
Distance from the windbreak side of the activity area to its leeward edge.
Extra width so wind does not curl immediately around the edges into camp.
Leave room for stakes, guylines, flame clearance, and wind spill right behind the break.
Set to 0 if you do not want a site-fit check for the main run.
Used to see whether the required sheltered zone fits before the next campsite feature.
💨Wind and Barrier Details
0 means wind hits square-on. Higher values mean diagonal wind that needs more length or returns.
Used for anchoring and caution flags. Gusts can be much higher than a forecast average.
Open exposure increases anchor count and lowers the confidence in short barriers.
A 35% margin turns 18 mph steady wind into about 24 mph design gust planning.
The usable calm zone depends heavily on barrier height and porosity.
Semi-porous breaks usually make smoother shelter than a perfectly solid wall.
Weak stake ground needs more anchors or weighted deadmen.
Cooking and sleeping targets prefer longer, calmer shelter zones.
🔧Panels, Overlap, and Anchors
Typical modular windbreak panels are often 5, 6, 8, or 10 ft sections.
Overlap reduces the effective length of each added section.
Adds fabric for wrapping around poles, tying to trees, or turning ends slightly downwind.
Only useful when the layout is two runs with a center gap. Keep gaps leeward if possible.
Closer spacing gives better shape control in gusts and on soft ground.
Use more guylines for tall panels, solid tarp, and exposed sites.
Adds a real-world buffer for imperfect angles, uneven ground, and damaged panel edges.
Exposed doors and chairs need more side return length to feel sheltered.
This planner estimates campsite wind reduction geometry and anchoring quantities. It is not a structural wind-load rating; stop using fabric barriers in unsafe gusts or lightning.
Wind Break Plan
📋Quick Specs
📐Windbreak Reference Tables
| Barrier style | Typical shelter depth | Best use | Watch-out |
|---|---|---|---|
| Solid tarp or solid fence | 4-7x height | Short flame or dust control | Can create strong turbulence and high anchor load |
| Low-porosity fabric | 6-9x height | Camp kitchen, beach wind screen | Needs dependable stakes and side returns |
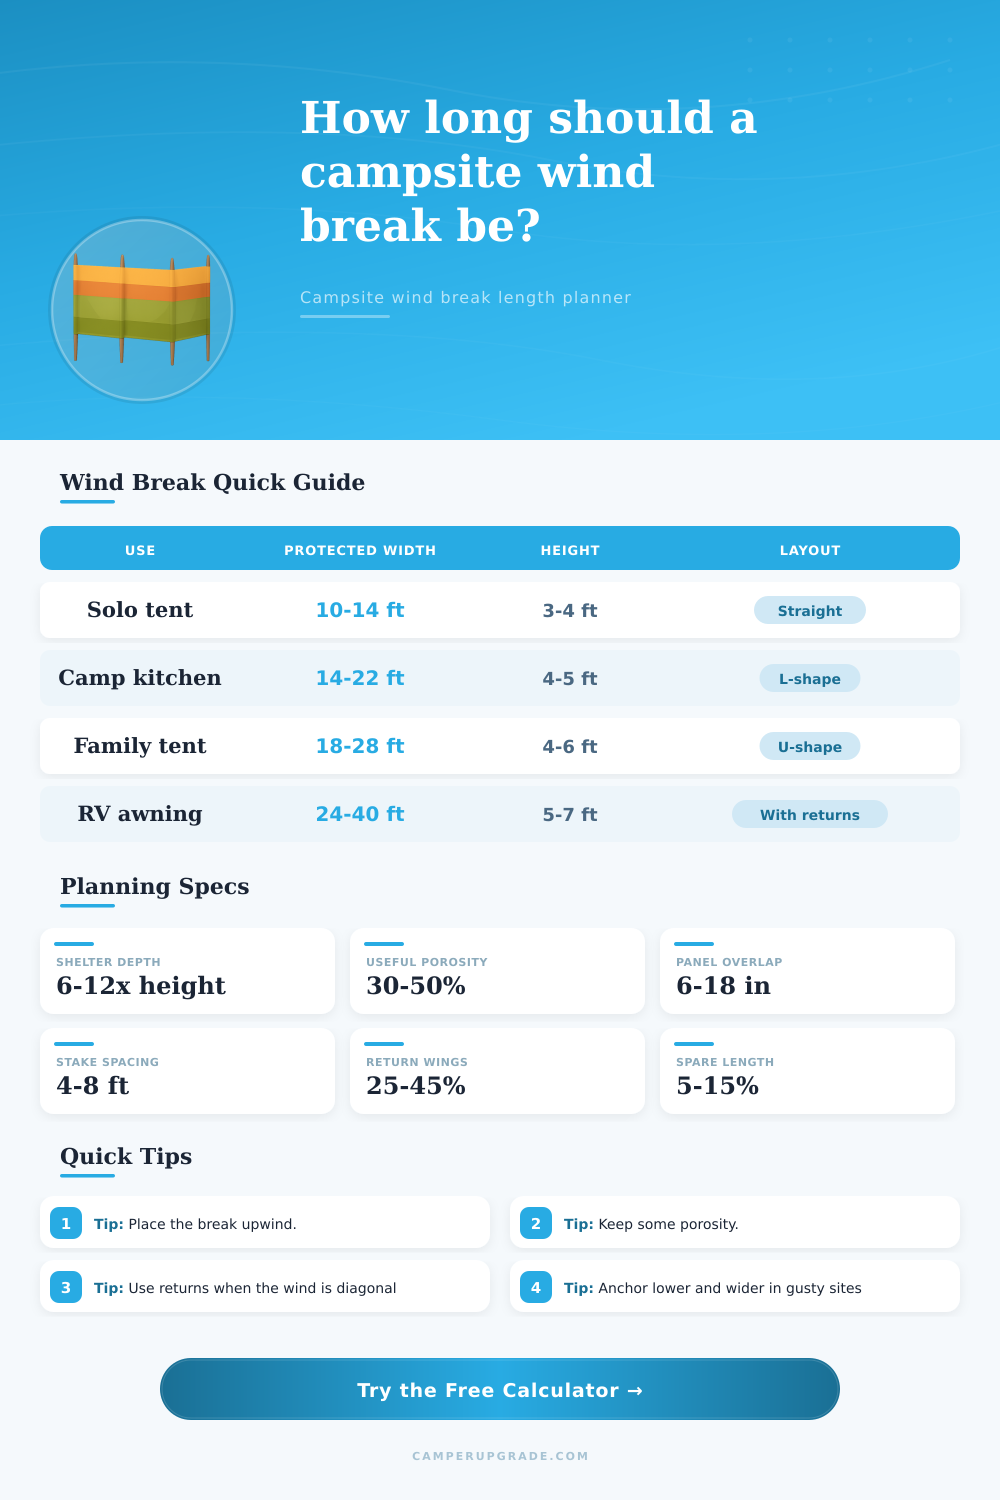
| 30-50% porous mesh | 8-12x height | General tent, seating, and awning comfort | Still needs enough width to prevent edge curl |
| Brush, snow wall, or open fence | 5-10x height | Natural campsite screening | Irregular gaps can leak gusts |
| Campsite use | Common protected width | Typical setback | Layout note |
|---|---|---|---|
| Backpacking tent | 10-14 ft | 4-8 ft | Straight line is often enough below treeline |
| Camp kitchen | 14-22 ft | 8-12 ft | Use an L-shape so smoke, flame, and traffic have room |
| Family tent | 18-28 ft | 8-12 ft | Two short returns protect doors and vestibules |
| RV awning side | 24-40 ft | 6-14 ft | Main run should cover the door, steps, and awning seating |
| Group common area | 35-70 ft | 10-18 ft | Use curved or staggered panels rather than one sail-like wall |
💡Planning Tips
First, measure how far you want the area to protect from ground level in both dimensions: width and depth. In other words, what’s the area you’ll need for your chair(s), kitchen, tent, etc? Next, account for wind direction; a modest crosswind push the protected area to one side. Also figure in distance between your gear and the point where it breaks out; this provides wind some breathing room so it spills down rather then hitting people or fabric instently.
Depending on these variables, you may need just a string of panels running at a right angle to wind or you might require returns that sweep back toward sides. The combination of height and porosity matter. The higher, the better at blocking wind, provided the fabric allow some airflow. Fully solid walls can results in a low pressure area on their downwind side, which pulls the gusts right back into camp. Typically a mesh that has 30-50 percent porosity create the most smooth shelter by slowing the wind, without swirling it up.
How to Plan Your Wind Break
Once you know your porosity and height selection, the calculator do the rest. So you don’t have to guess where the calm zone extend. The anchoring plan depends more off ground conditions than most realize. Stakes can be spaced further apart where soil is firm. Where it’s sand or gravel, they has to be spaced closer together, sometimes requiring longer stakes or adding weights. That difference gets captured by the exposure setting in the tool.
For example, you’d use a more conservative layout at a beach or ridge site different than one in a sheltered forest clearing, even when the wind speed readout is identical. One mistake is to treat the windbreak as one wall rather than a system. For example, if wind approaches diagonally, don’t neglect the additional length of the spill that forms along diagonal. Also, when not directly into or out of the wind, know that adding return lengths can contributes significant extra total length.
The reference tables on the page provides typical protected widths for various campsite uses. It will also help you verify that you are planning for the type of shelter you actualy need. Now you know how many panels there are, their length, and how many anchors you need. This lets you decide if you can set this up on your site and if it will be worth the setup time.
It might of seemed possible on paper, with a long barrier requiring two dozen stakes, but it would be to awkward for a quick trip. The tool helps by showing you this trade-off, so you can either reduce the protected depth to match or accept a somewhat smaller sheltered area. What we’re going for isn’t a perfect wall of still air. We’re going for a pocket that holds long enough to let you go sleep, cook dinner, whatever, and remain usable. And when the ground matches the numbers you’re standing on, that pocket shows up without any drama.