Backpacking Trip Pack Volume Calculator
Estimate the backpack capacity you need from gear bulk, food days, bear canister displacement, water carried inside the pack, compression, outside carry, and fit margin.
⛺Choose a trip preset
Your Pack Volume Estimate
🎒Pack volume inputs
How it works: the calculator estimates day-one packed volume, subtracts practical compression and outside carry, then adds a fit margin so the recommended backpack is not packed brick-solid.
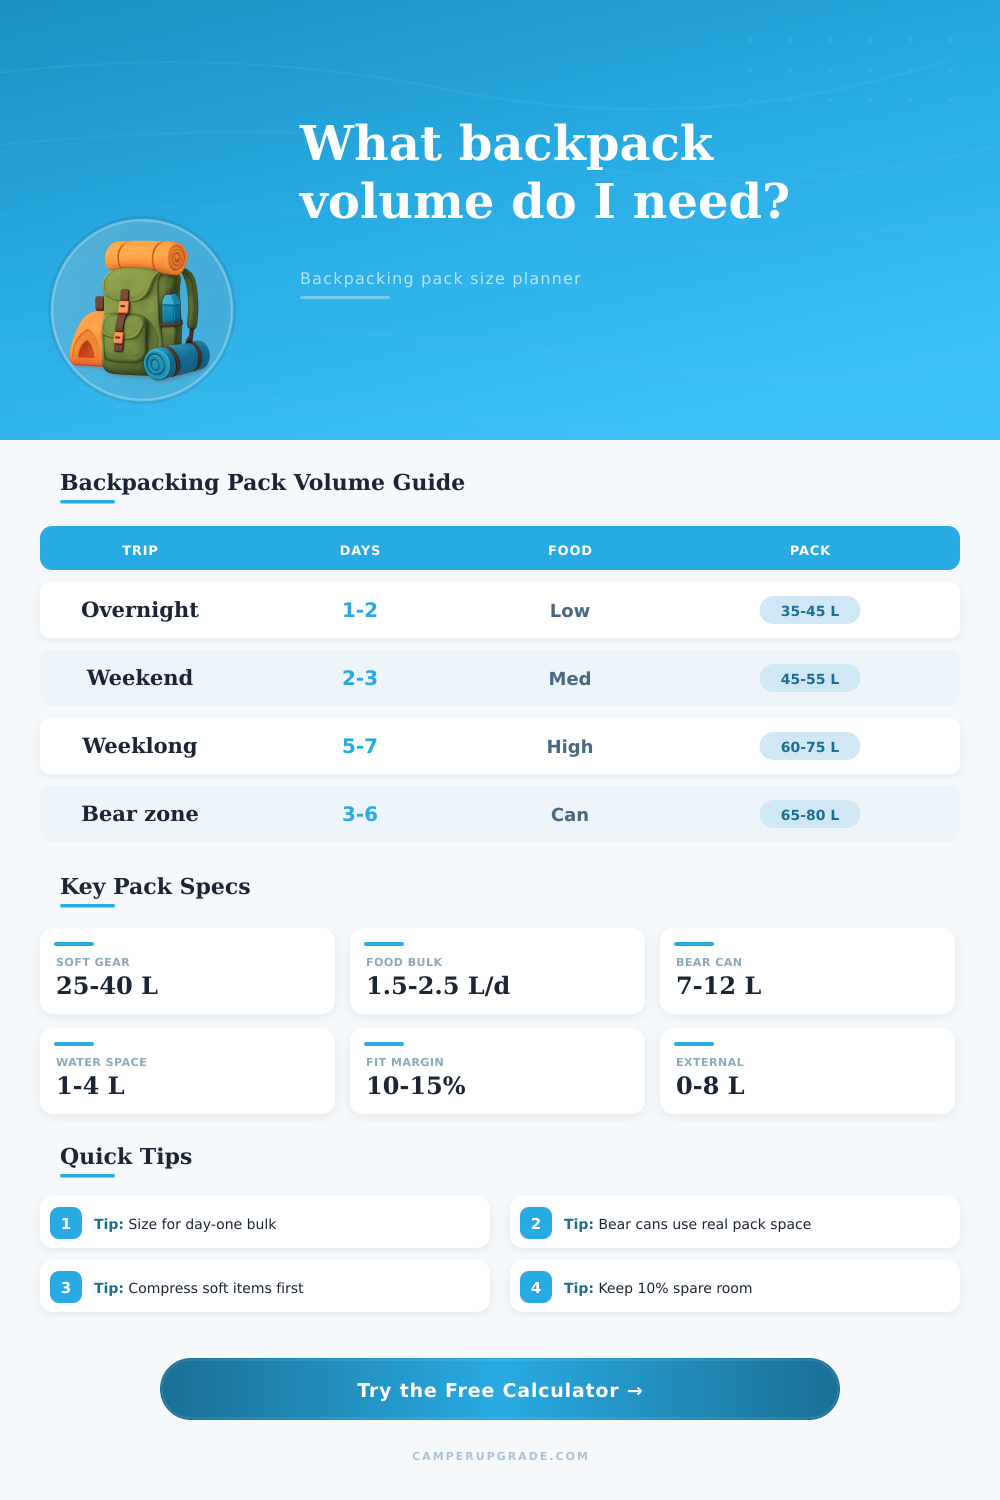
📏Common backpack capacity classes
📊Food and container volume references
| Item | Typical Volume | Use In Calculator | Planning Note |
|---|---|---|---|
| Dense repacked food | 1.3-1.7 L/day | Food per day | Good for dehydrated meals, nuts, bars, and compact lunches. |
| Normal trail food | 1.8-2.2 L/day | Food per day | Works for mixed snacks, dinners, breakfasts, and drink mixes. |
| Bulky food bag | 2.4-3.0 L/day | Food per day | Use for chips, tortillas, larger packaging, or high-variety menus. |
| Small bear canister | 7 L outside | Bear can size | Often fits short solo trips but creates a rigid packing shape. |
| Medium bear canister | 10 L outside | Bear can size | Common for several nights when food volume is moderate. |
| Large bear canister | 12 L outside | Bear can size | Plan extra margin because the cylinder rarely nests perfectly. |
🧭Trip scenario reference table
| Scenario | Likely Internal Need | Typical Pack | Main Volume Driver |
|---|---|---|---|
| Warm ultralight overnight | 28-38 L | 35-45 L | Sleep kit and shelter volume. |
| Standard weekend loop | 38-48 L | 45-55 L | Food, rain layers, and kitchen gear. |
| Five-day three-season route | 50-62 L | 58-68 L | Food bulk and fit margin. |
| Bear canister itinerary | 55-72 L | 65-80 L | Rigid canister displacement. |
| Dry desert carry | 58-75 L | 65-85 L | Water stored inside the pack. |
| Cold shoulder-season trip | 60-80 L | 70-90 L | Insulation, sleep system, and weather bulk. |
🧳Compression and outside-carry guidance
| Adjustment | Reasonable Range | Best Applied To | Caution |
|---|---|---|---|
| Soft compression | 8-25% | Quilt, puffy layers, tent fabric | Hard goods, food, and canisters barely compress. |
| Mesh pocket carry | 2-6 L | Rain shell, filter, lunch, wet tarp | Bulky outside items can snag or shift balance. |
| Side pocket carry | 1-4 L | Water bottles and tent poles | Do not subtract water if it rides inside the pack. |
| Top strap carry | 3-10 L | Foam pad or empty bear can | Keep heavy rigid items close to your back when possible. |
💡Pack sizing tips
When selecting a backpack for a multi-day hike, decide whether or not all of your equipment can be packed with some room to spare. Often, the first morning after you pack all your gear show a clear sign of whether you will be comfortable: the bag’s zipper won’t close. At this point, an approximate volume can help set a more reasonable goal before filling bags at the trailhead.
Typically we all think about pounds of food and days on trail first. That’s important but doesn’t reflect the space that clothing layers, a sleeping pad, and shelter fabric take up when packed. And there is also a rigidity issue with a bear canister which seldom hug the soft stuff. It’s the space outside the bag it takes up rather than the food inside that matters. This calculator does that calculation for you after entering those categories so you don’t have to guess how much the hard stuff move the rest of your gear.
How to Choose the Right Backpack Size
The impact of weather on what you pack is something you might easily underestimate. A spur of cold weather require more insulation, a beefier rain shell etc. All of those add up to more volume of soft stuff before you even start compressing it. A couple dry days and stable nights will make the pack several liters lighter instead. You can adjust this for weather and understand how small percent adjustments affect your actualy capacity needs. It helps because you don’t have to restart building the whole packlist.
Other places that people don’t seem to expect are in terms of compression savings. For example, soft things such as clothes and quilts compress down nicely into their stuff sack. Water bottles, food packaging, hard goods does not. It doesn’t matter how tightly you squish them; they won’t get any smaller. Only the part of your load that is compressible will be compressed by the tool. That way the overall volume number isn’t misleading. That makes a difference if you need to know whether your pack can fit another night’s worth of food or if you need a larger one.
External carry options are another way to control volume. A few liters of gear can be carried outside the main compartment using mesh pockets, side straps, and top compression. This works best when it’s evenly balanced and doesn’t snag on brush. Before subtracting the margin for fit, subtract any external volume so you don’t end up selecting a pack that is too large for your needs. Leave room for odd-shaped items that will never pack well.
Finally, add a little extra space. At the end of a wet day and after a few days when your food bags have settled in, you want some space left over, but not enough to warrant going up one full size category. Ten or maybe 15% extra provides that wiggle room.
Now go through the math again and look at how much volume you came out with. How does that compare with the standard capacity categories noted on the page? That will tell you if this is still doable with your current pack…or should of you be thinking bigger? This isn’t about matching your gear to the exact number of liters on paper. This is about walking out the door with the knowledge that you packed what you think you need and that the pack on your back represents how much your furnitures really weighs.