Avalanche Slope Angle Calculator
Estimate slope angle, avalanche terrain band, adjusted hazard score, and runout caution distance from field measurements and current snowpack red flags.
Avalanche terrain estimate
| Measured angle | Terrain band | Typical interpretation | Calculator score bias |
|---|---|---|---|
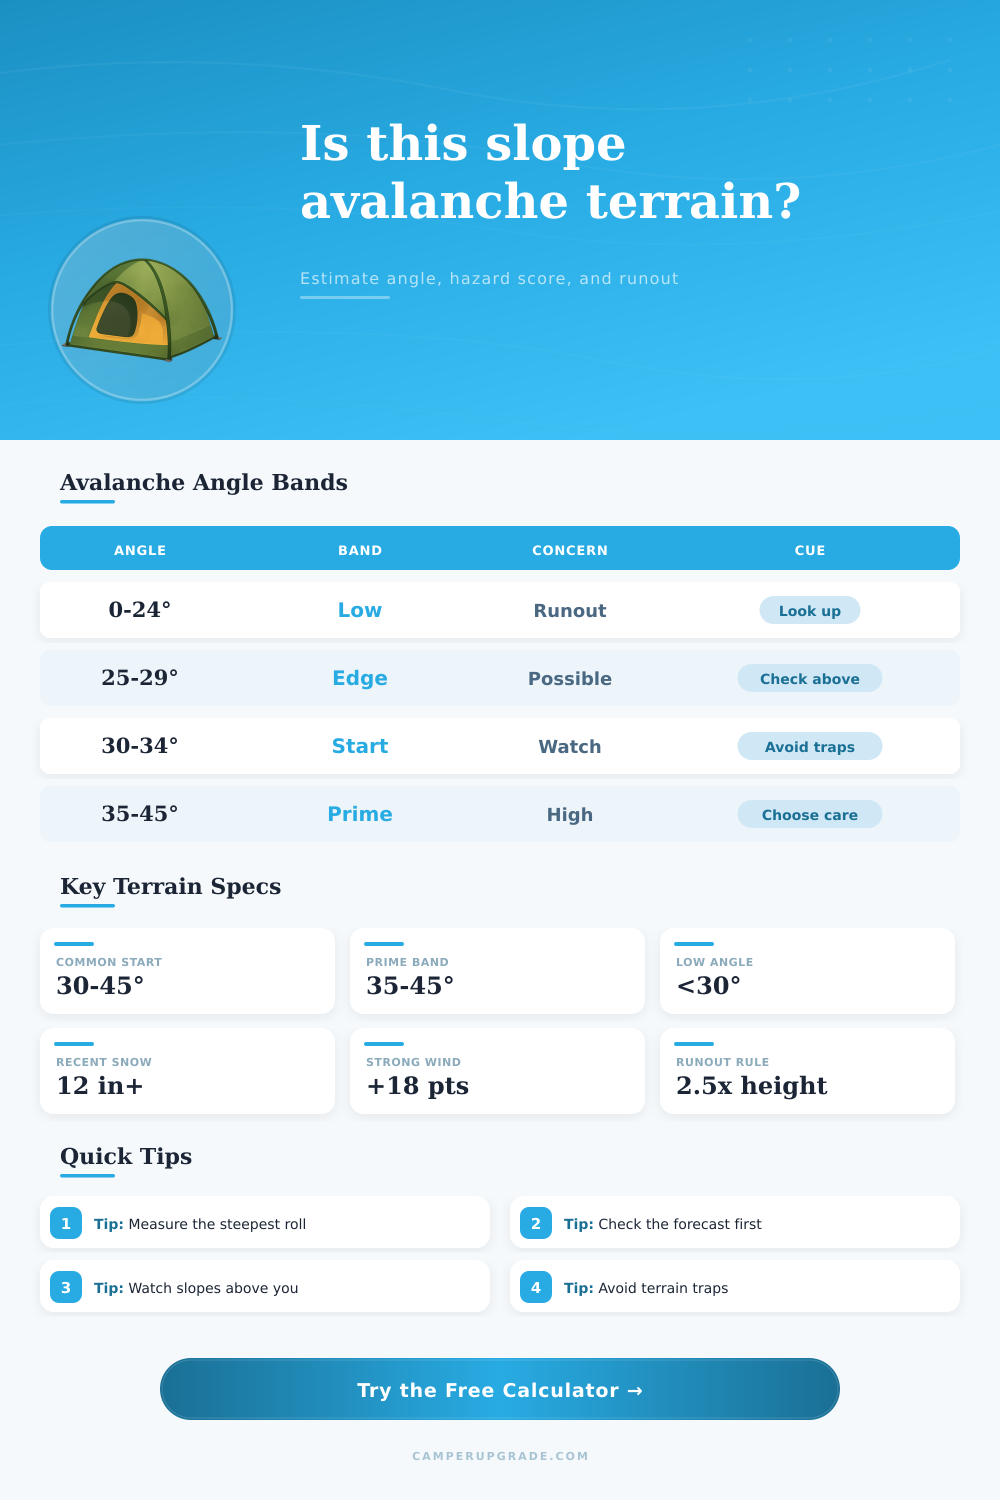
| 0-24° | Low-angle terrain | Usually too flat to start a slab, but may be runout | Low angle score |
| 25-29° | Marginal or connected | Possible in unusual conditions and exposed below steeper terrain | Edge score |
| 30-34° | Avalanche starting terrain | Common lower start-zone band for slab avalanches | High angle score |
| 35-45° | Prime avalanche terrain | Most efficient slab-release range in many education references | Peak angle score |
| 46-50° | Very steep avalanche terrain | Can avalanche; snow may also shed more often | High score |
| 50°+ | Extreme steep terrain | Often complex, exposed, and not made safe by steepness alone | Elevated score |
| Input | Low adjustment | High adjustment | Meaning in the model |
|---|---|---|---|
| Avalanche danger | Low: +4 | Extreme: +44 | Forecast danger is the largest non-angle multiplier |
| Recent snow | 0-3 in: +0 | 18 in+: +18 | Storm loading raises instability and runout concern |
| Wind loading | None: +0 | Strong: +18 | Wind slabs can form on lee and cross-loaded features |
| Slope shape | Treed: -4 | Gully: +20 | Shape changes trigger likelihood and consequences |
| Elevation band | Below: +0 | Alpine: +10 | More exposure usually means more wind-affected snow |
| Aspect | South: +0 | N-NE: +8 | Shaded aspects often preserve weak snow longer |
| Angle | Rise over 100 ft | Rise over 30 m | Terrain note |
|---|---|---|---|
| 25° | 47 ft | 14.0 m | Below common slab-start band |
| 30° | 58 ft | 17.3 m | Start-zone threshold screen |
| 35° | 70 ft | 21.0 m | Prime avalanche terrain begins |
| 38° | 78 ft | 23.4 m | Common steep open slope |
| 42° | 90 ft | 27.0 m | Very serious slab terrain |
| 45° | 100 ft | 30.0 m | Steep sustained terrain |
| Path height | Base caution | Loaded caution | Use note |
|---|---|---|---|
| 300 ft / 90 m | 750 ft | 900-1050 ft | Small path or road cut |
| 500 ft / 150 m | 1250 ft | 1500-1750 ft | Short bowl or glade path |
| 800 ft / 245 m | 2000 ft | 2400-2800 ft | Treeline start zone |
| 1200 ft / 365 m | 3000 ft | 3600-4200 ft | Large alpine path |
| 1800 ft / 550 m | 4500 ft | 5400-6300 ft | Major mountain path |
| 2500 ft / 760 m | 6250 ft | 7500-8750 ft | Large connected basin |
Avalanche terrain can be difficult to identify because there is no easy clues that indicate the presence of avalanche terrain. Many slope may look gentle on the slope but also contain a steep section that is above the trees. Terrain that may be sunny and slopes that has often been skied may behave differently after a windy night in the mountains.
These different factors tie into the importance of the slope angle in making decisions regarding the terrain that is to be skied. The calculator can help to determine the slope angle, but that requires knowledge of the terrain. People can attempt to guess the slope angle of the terrain that is to be skied.
Measure the slope angle and check for avalanche danger
However, guessing the angle can lead to inaccuracy measurements of that slope. People’s eyes alone cant accurately determine the angle of the slope if the slope angle are above thirty degrees. A small change in the angle of the slope can change the terrain from one that is marginal to one that is likely to exhibit avalanches.
Using a slope measurement application on a persons phone or using an inclinometer can help to remove the guesswork associated with estimating the angle of the slope. Determining the angle of the slope take only thirty seconds and will provide a more accurate reading than individuals guessing the angle. Using the rise over run calculation on the map will allow individuals to determine if the angle is one that is associated with slab avalanches.
The calculator will use the angle measurement and other observations to determine the hazard score on the slope. The depth of the snow that fell recently is one of the observations that must be made. New snow will add to the weight of the slope and may contain layers that is weak and can lead to avalanches.
Another observation is loading caused by the wind. If there are pillows in the snow, this indicate that the wind has loaded the snow into this area. The shape of the slope is another observation that can be used.
Convex slopes or gulys can make it difficult for individuals to escape debris on the slope. The elevation of the slope and the aspect of the slope are two other observations. The aspect of the mountain determines how much sun or how much wind the slope receive.
North aspects of the mountain slopes will hold weak snow layers for longer periods due to the cold temperature of these aspects of the mountain. These observations will be fed into the calculator to determine a hazard score. The hazard score will not provide a green light for individuals to ski those slopes.
However, it will provide a score as to how many red flags is present on the slope. For instance, if an individual sees that there is a moderate hazard score yet the weather forecast reveals considerable danger on this slope, the individual should not ski on this slope. A high hazard score will be more acceptable if the weather is expected to be safe on the day in question.
The hazard score can be used to compare one slope to another. The runout distance of the avalanche is another factor that is considered to be important yet not often thought of as important. Most accidents with avalanches did not occur on the steepest portion of the slope.
Most accidents happen on the portion of the slope where the avalanche reaches the most amount of speed and volume. This can be estimated by the height of the path that is to be skied and the hazard score. The planning buffer is not exact, but it does allow individuals to remember that the avalanche can travel for a considerable distance.
If the slope is deep or the terrain allows for the avalanche to travel two or three times the vertical distance of the area that is to be skied, individuals should look uphill from these paths to ensure that they do not encounter an avalanche. Individuals often make mistakes when determining the slope angle. One mistake is to only measure the angle of the slope that is to be skied.
Individuals may not consider the steeper portion of the terrain that may be above the slope. Another mistake is to take one reading with the inclinometer yet not consider that the slope may have a steeper portion that is nearby. Finally, people may tend to discount the effect of the wind on the terrain.
These common mistakes will cause the hazard score to be lower than the actual danger that the individual will encounter on the slope. The reference tables are used to determine the angle of the terrain without memorizing all of the angles. The tables also provide information on how each observation will change the hazard score.
This will allow individuals to determine which observation is the most important on a specific day. For instance, if there is strong wind loading of the slope yet the aspect of the mountain is facing north, this observation is more important than the fact that the angle of the slope may be lower than the average slope. While the avalanche terrain calculator is a helpful tool, it doesnt replace the importance of professional training in avalanche terrain and the daily avalanche terrain forecast.
The calculator is helpful if individuals already know the specifics of avalanche terrain. The avalanche terrain forecast will provide information regarding the area in which the individual will ski yet the calculator will provide information regarding only the specific slope. The most important habit that individuals should have is to measure the angle of the terrain before committing to skiing on the terrain.
Individuals should stop at the edge of the terrain to measure the angle with an inclinometer. If the angle is within the prime release band for avalanches and the observations of the terrain provide other signals of danger, individuals should avoid skiing on that slope. Such a habit will allow for good judgment to become a habit of these individuals.