Van Ceiling Slat Board Count Calculator
Estimate ceiling slats, board stock, visible spacing, cutout credit, fasteners, and finished ceiling weight for a camper van build.
Weights are planning densities for estimating ceiling load from slat volume. Actual lumber varies with moisture content, milling, and finish build.
| Slat Face | Reveal Gap | Pitch Formula | Slats Across 68 in | Visual Feel |
|---|---|---|---|---|
| 1.50 in | 0.125 in | 1.50 + 0.125 | 42 slats | Narrow, detailed liner |
| 2.00 in | 0.188 in | 2.00 + 0.188 | 32 slats | Balanced camper ceiling |
| 2.50 in | 0.250 in | 2.50 + 0.250 | 25 slats | Common warm slat look |
| 3.50 in | 0.250 in | 3.50 + 0.250 | 19 slats | Fewer joints, wider boards |
| 5.50 in | 0.375 in | 5.50 + 0.375 | 12 slats | Plank style ceiling |
| Stock Length | Best For Ceiling Runs | Pieces Per 120 in Slat | Splice Pattern Note | Metric Length |
|---|---|---|---|---|
| 72 in | Short micro vans | 2 pieces | Stagger every other slat | 1.83 m |
| 96 in | Most home center boards | 2 pieces | Plan a clean cross rib line | 2.44 m |
| 120 in | Compact full runs | 1 piece | Minimal splice trimming | 3.05 m |
| 144 in | Long vans and fewer joints | 1 piece | Trim ends after dry fit | 3.66 m |
| 168 in | Extended vans | 1 piece | Check transport handling | 4.27 m |
| Van Or Build Area | Ceiling Run | Widest Width | Approx Area | 2.5 in Slats |
|---|---|---|---|---|
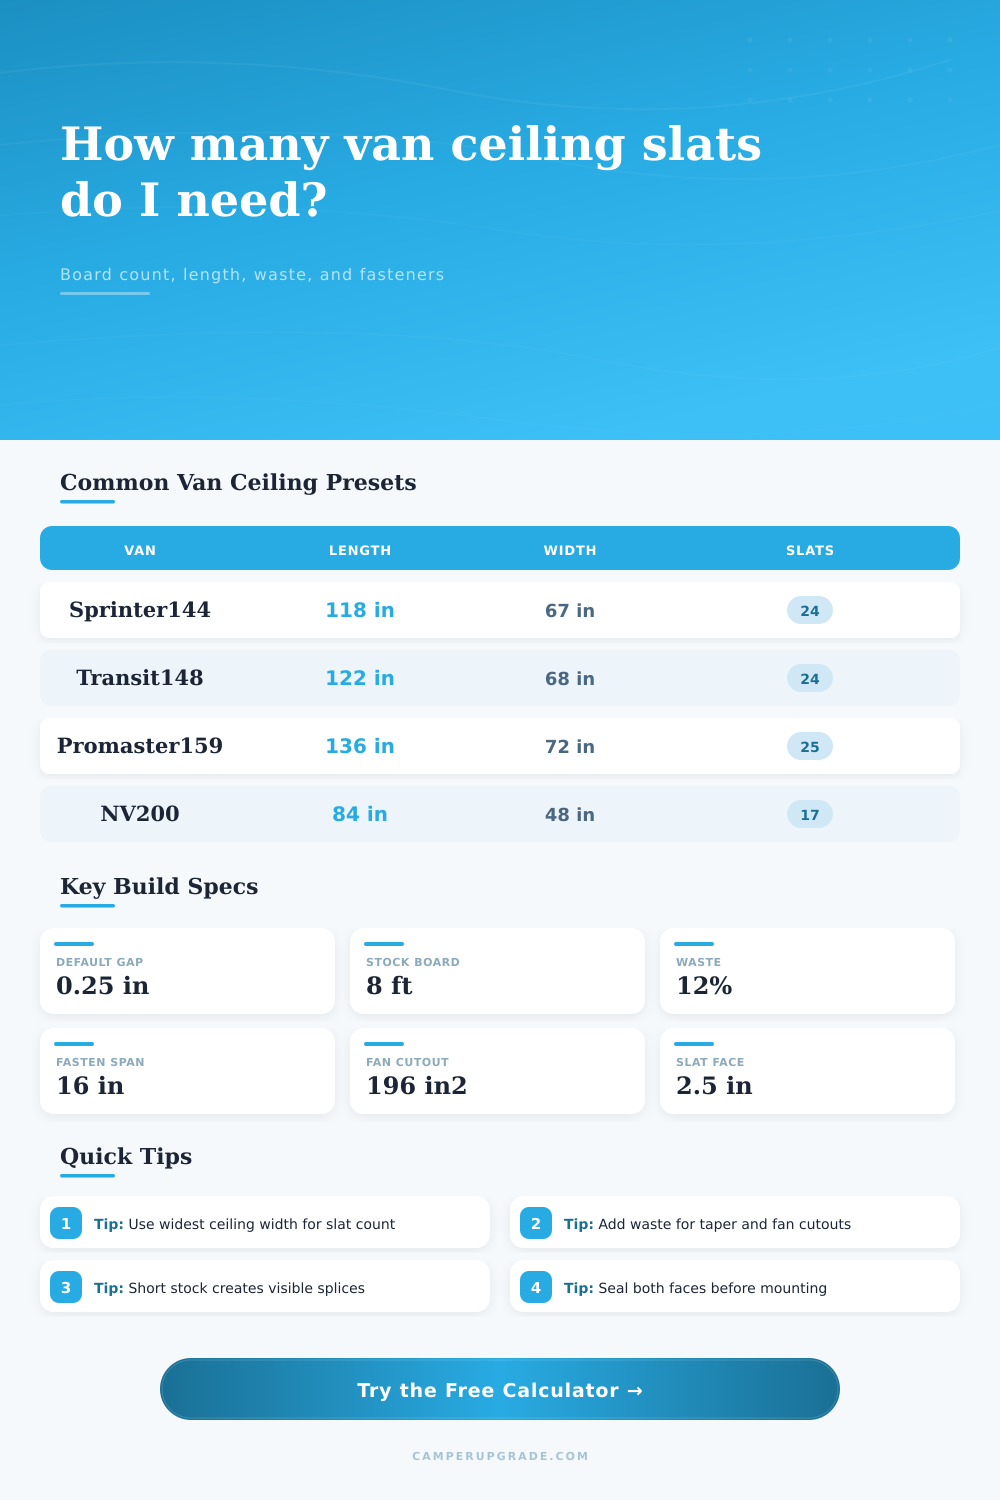
| Sprinter 144 cargo | 118 in | 67 in | 54 sq ft | 25 slats |
| Sprinter 170 cargo | 155 in | 68 in | 72 sq ft | 25 slats |
| Transit 148 high roof | 122 in | 68 in | 56 sq ft | 25 slats |
| ProMaster 159 | 136 in | 72 in | 67 sq ft | 27 slats |
| NV200 micro camper | 84 in | 48 in | 28 sq ft | 18 slats |
| Rib Spacing | Ribs On 120 in Run | Fasteners With 24 Slats | Use When |
|---|---|---|---|
| 12 in | 11 ribs | 528 at 2 each | Thin or flexible strips |
| 16 in | 9 ribs | 432 at 2 each | Typical furring layout |
| 18 in | 8 ribs | 384 at 2 each | Stiffer boards |
| 24 in | 6 ribs | 288 at 2 each | Rigid slats with adhesive |
| Material | Planning Density | Ceiling Behavior | Finish Note |
|---|---|---|---|
| Western red cedar | 23 lb/ft³ | Light, aromatic, soft | Seal knots and end grain |
| Kiln dried pine | 28 lb/ft³ | Easy to mill and curve | Prime resin streaks first |
| Poplar strip boards | 34 lb/ft³ | Stable paint-grade option | Finish both faces evenly |
| Baltic birch ply strips | 43 lb/ft³ | Uniform and strong | Sand exposed ply edges |
| Foamed PVC trim board | 32 lb/ft³ | Moisture tolerant | Confirm heat rating |
| Aluminum tube slats | 168 lb/ft³ | Strong but dense | Isolate metal contact points |
Looking up, you realize that the ceiling isn’t a single flat plane. It’s a jumble of metal ribs, insulation gaps, and gentle curves and tapers. “I can just screw some wooden slats across it,” you think. Easy-peasy. But then reality sets in. That curve doesn’t play nice. A board laid across the roof has to be cut on an angle or it will leave awkward gaps at either end if there’s no taper. How do you know? Enter the calculator (above). Plug in your board size and your roof size. Voila. Math done for you. No more guessing how many boards you need, or what fraction of each one ends up in the trash. Until you’re standing on a ladder with a stack of unusably-short offcut, it’s hard to appreciate how much difference even a slight taper make.
Ceiling Width Most vans has their widest part of the ceiling roughly centered in the van. This is the most important measurement for the tool. It tells it how wide to make the slats. If you measure the front or rear width instead of the widest point, you’ll come up short when you reach the bulge in the middle. When you get to the middle part where it bulges out you will be one board too short. The tool assumes you’re running them from front to back. So it uses the width to figure out how many boards span across the vehicle.
Plan Your Van Ceiling Before You Start
A common choice is to run 2 1/2 inches wide with a quarter inch gap between each. That’s a nice happy medium where there isn’t too much space but not so tight it looks like wall is made of toothpicks. Slats narrower than this still look nice, but they take longer to put in and require more fastener hole. Fewer joints are better, but fewer boards means wider slats which may appear too large in a smaller van. Here’s a table to help you visualize the density for different board widths (on the page). It will give you a feel for what to expect until you start cutting.
While aesthetics are important, so is material selection. Do you want a wood-grain finish or a solid color? Does it need to be painted? Is it going to get stained? How hard is it to bend/shape/screw together? Cedar smells great and is lightweight, but it is soft. It is soft and prone to dents. Pine is inexpensive and easy to work with, but it takes stain really well and won’t hold any paint unless sealed well. Actualy, it can be tricky. Poplar takes paint beautifully, which is good if you’re planning to use a solid color instead of showing off the wood grain.
The calculator accounts for material density and calculates how much your finished ceiling will weigh. Why does this matter? Anything you add to the roof (including fixtures and insulation) impacts your van’s center of gravity. While one additional pound by itself may not feel significant, all those little pounds adds up. Aluminum looks sleek and industrial, but it is also dense and conducts heat or cold straight into your head space. Wood has a bit of a thermal break compared to metal. This is nice on a cool morning, but it is only a small consolation prize.
Most people’s budgets go off track because of unexpected waste. But you can’t get a perfectly straight line on a ceiling. It curves, the boards warp, things don’t turn out right. There is an option to adjust the waste percentage in the tool. Twelve percent seems like a conservative number for the average build. With skylights or a roof fan you’ll end up losing even more material. These openings result in shorter pieces which won’t typically be usable for the main run. You can tell the calculator how much credit to give these scraps; assuming you’re smart about laying everything out. Realistically, plan every cut and expect to get about 50% of this material back. This is a reasonable expectation for someone who has built something before. Rushing? Assume no credit and order a few extra boards. Running out halfway through the project is far more expensive than having some excess lumber.
The other factor that affects how sturdy it is as well as what it looks like is the fastener spacing. Furring strips are usually 16″ apart (rib spacing), which is sufficient to prevent sag of the slats. Depending on the unevenness of your ribs in the ceiling, you may require more screws for bridging purposes. The number of screws required is calculated by the tool depending on the rib spacing entered. It sounds like a small thing, but it’s annoying to have to purchase an insufficient number of screws halfway through the construction process. Everything should be at arm’s reach.
The ceiling plan is a matter of expectation. It’s simple mathematics; plug in the numbers to the calculator and you’ll be good to go, or at least well on your way to ordering fasteners and materials. Nothing is perfect. Daylight is also limited. This is where the calculator provides a decent base to work with. It takes the guessing out of the equation when compiling your shopping list. From there, it’s all a matter of time and keeping your hands steady. Your goal is a ceiling that looks like it was done intentionally, rather than hastily. You achieve that by knowing exactly how many boards you need before cutting the first one.
Small thing, big deal. You should of planned ahead.