Hammock Structural Ridgeline Calculator
Calculate finished eye-to-eye length, cut length, estimated ridgeline load, and cord safety margin from hammock length, sag ratio, hang angle, load, material, and splice or knot efficiency.
🏕Named Hammock Presets
⚙Ridgeline Inputs
Ridgeline Results
🧵Cordage Material Comparison
| Material | Typical Break Strength | Stretch Behavior | Best Use In This Calculator |
|---|---|---|---|
| Amsteel Blue 7/64 in | 1600 lb / 726 kg | Very low stretch UHMWPE | Strong structural ridgelines with spliced fixed eyes |
| Amsteel Blue 1/8 in | 2500 lb / 1134 kg | Very low stretch UHMWPE | Heavy users, loaner hammocks, and conservative margins |
| Lash-It or Zing-It 1.75 mm | 500 lb / 227 kg | Low stretch UHMWPE throwline | Light structural ridgelines only when load estimate is low |
| Dyneema accessory cord 2.2 mm | 650 lb / 295 kg | Low stretch, varies by maker | Adjustable ridgelines and compact backpacking kits |
| UHMWPE utility cord 2.5 mm | 900 lb / 408 kg | Low stretch, slippery knots | Midweight ridgelines with hardware or spliced eyes |
| Polyester accessory cord 3 mm | 400 lb / 181 kg | Moderate stretch | Non-structural ridgelines or very light loads |
| 550 paracord | 550 lb / 249 kg | High stretch under sustained load | Temporary measuring line, not preferred for final sag |
| Static cord 4 mm | 1000 lb / 454 kg | Low to moderate stretch | Durable camp setups where bulk is acceptable |
📏Ridgeline Ratio Reference
| Ratio | Feel In A Gathered-End Hammock | Example On 11 ft Body | Use When |
|---|---|---|---|
| 80% | Deep sag, shorter diagonal reach, softer shoulders | 105.6 in / 268 cm | You want a deeper lay or have a narrow fabric body |
| 81% | Deep but more controlled sag | 106.9 in / 271 cm | Shorter hammocks feel too tight at 83% |
| 82% | Slightly deeper than the common baseline | 108.2 in / 275 cm | Reducing calf ridge on some 10 ft hammocks |
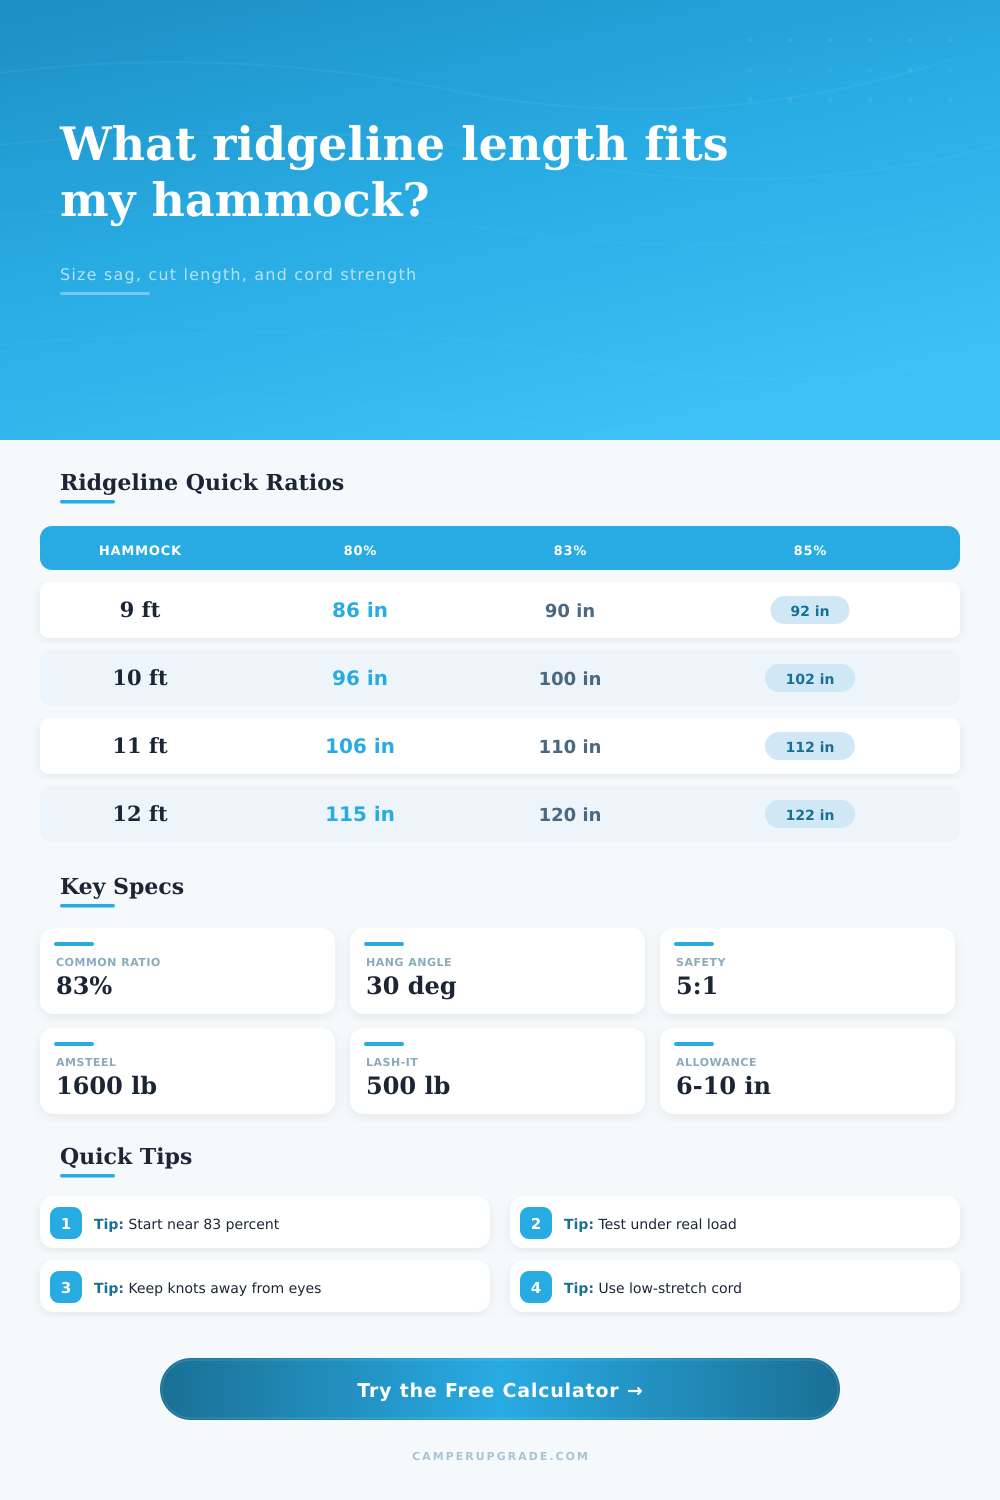
| 83% | Common gathered-end starting point | 109.6 in / 278 cm | You need a reliable first test length |
| 84% | Flatter lay with modestly higher tension | 110.9 in / 282 cm | The 83% test feels too banana-shaped |
| 85% | Flatter and tighter, less sag reserve | 112.2 in / 285 cm | Wide fabric body or very diagonal sleeping position |
| 86% | Very flat for many gathered-end hammocks | 113.5 in / 288 cm | Only after testing load and shoulder comfort |
Formula: finished eye-to-eye length = hammock body length × selected ratio. Loaded length estimate = finished length × (1 + stretch percent).
🧮Common Hammock Lengths At 83%
| Hammock Body Length | 83% Finished Ridgeline | Cut Length With 8 in Each End | Metric Finished Length |
|---|---|---|---|
| 9 ft / 108 in | 89.6 in | 105.6 in | 228 cm |
| 9.5 ft / 114 in | 94.6 in | 110.6 in | 240 cm |
| 10 ft / 120 in | 99.6 in | 115.6 in | 253 cm |
| 10.5 ft / 126 in | 104.6 in | 120.6 in | 266 cm |
| 11 ft / 132 in | 109.6 in | 125.6 in | 278 cm |
| 11.5 ft / 138 in | 114.5 in | 130.5 in | 291 cm |
| 12 ft / 144 in | 119.5 in | 135.5 in | 304 cm |
⚠Hang Angle And Force Reference
| Hang Angle | Suspension Tension With 200 lb Load | Horizontal Pull Estimate | Calculator Meaning |
|---|---|---|---|
| 15° | 386 lb per side | 373 lb | Very tight hang; forces rise quickly |
| 20° | 292 lb per side | 275 lb | Tight but common when trees are far apart |
| 25° | 237 lb per side | 214 lb | Moderate force and easier pitch control |
| 30° | 200 lb per side | 173 lb | Common target for gathered-end hammocks |
| 35° | 174 lb per side | 143 lb | Lower force, deeper suspension drop |
| 40° | 156 lb per side | 119 lb | Gentle forces but may need higher straps |
Formula: per-side suspension tension = loaded weight ÷ (2 × sin hang angle). Horizontal pull = loaded weight ÷ (2 × tan hang angle).
🔒Safety Factor Guide
| Safety Factor | Use Case | What It Does | Formula Check |
|---|---|---|---|
| 3:1 | Personal ultralight setup you inspect often | Accepts a smaller reserve margin | WLL = adjusted break ÷ 3 |
| 5:1 | Typical structural ridgeline target | Balances weight, strength, and normal movement | WLL = adjusted break ÷ 5 |
| 8:1 | Loaner hammock or mixed users | Adds reserve for unknown entry habits | WLL = adjusted break ÷ 8 |
| 10:1 | High-use camp or cautious build | Requires much stronger cord or lower loads | WLL = adjusted break ÷ 10 |
💡Ridgeline Calculation Tips
If you’ve hung a gathered end hammock before, you know what I’m talking about: from the ground, it appears as though you’re hanging a banana. Your legs dangle over the ends, your back rests on unforgiving fabric and your shoulders feel taut. So what do you do? You cinch down the suspension. But because both ends of that fabric have been tightened to two solid anchors, the result isn’t anything but a worsening of the ridge.
Nine times out of ten, it’s not the straps or the trees that create this issue it’s the ridgeline. Most hikers will reach for whatever rope is lying around and attempt a length based solely on their own guesswork, either until they get fed up with it or it just “feels right.” That’s the thing about guess work, what should of been a leisurely chill in your hammock becomes a chore.
How to Get Your Hammock Ridgeline Right
To begin getting the line right, first understand that the structural ridgeline will serve as the backbone (or skeleton) of your whole suspension system. After determining the desired sag ratio and the length of your hammock body (the length between the topmost points of the sides), use this handy calculator to do the math for you, no more cutting and retying knots under headlamp. But what’s the most critical data entry? That’s the ratio percentage.
For most hammocks with 11-foot bodies, 83 percent is starting point. That means the line should measure 83% of the total fabric length end to end. To make it slightly deeper and more banana-shaped, increase that percentage to say 84 or 85 percent. Too rigid and uncomfortable? Decrease it to 80 or 81 percent.
Whatever it is, tool converts that percentage to a precise finished eye-to-eye measurement and tells you exactly how much line you need to cut before you get started. Amateurs who cut the cord waste material because they don’t consider how they’ll terminate the line. For example, if you’re going to bury tails in a splice, then you need extra length at each end. Based off what you select, calculator adds this allowance to the total cut length, measuring from one final knot to the other. That ensures that you won’t have just spliced your new line and found out it’s two inches short.
Not only does length matter, but also material choice. For really tight ridgelines without sag, go with Amsteel Blue 7/64 inch; it’s crazy strong and has minimal stretch. Paracord appears the same but stretches a lot when loaded. This means your carefully tuned ridgeline will gradualy sag over time. Using a couple of different materials, tool shows you a safety margin, comparing them based on their break strengths and how well they holds at the ends.
In general, I’m aiming for at least a 5:1 safety factor if I’m using this for my own purposes, meaning the line could theoretically be under five times the expected load before breaking. This provides some extra cushion for dynamic forces like windy nights and jumping into bed. Another key element to this physics equation is the angle at which your hammock hangs. A shallow angle increases exponential tension on both the trees and the cord. Hanging from two widely spaced trees with little room for clearance will rapidly increase these forces. The tables in their tool shows how tension increases when the angle is less than 30 degrees. The tension is higher then comfortable, but it stays within the safe load range for the suspension points and the cord itself.
Even if you have the math dialed in, everyone’s different. While some people like a deeper curve, others want a more flat lay. So test away, because testing is non-negotiable. Create your adjustable loop and figure out what works best beneath your sleeping weight. When you’ve got the hang of it (pun intended) measure the loaded line and input that value into the calculator so you can get the exact length for your final version. It is longer than simply tying it snug, but it is worth it every time you go to bed afterward.
In conclusion: A good ridgeline can turn your hammock from some fabric that’s hanging in the air into something that feels like a real bed. Sometimes it’s just a couple inches of sag here or there, depending on whether a tight line or a loose one is used. But if you nail the fine points, then you’ll spend more time sleeping out under the stars and less time futzing with your ridgeline.