Tarp Catenary Cut Depth Calculator
Estimate cat-cut depth, curve length, station offsets, and reinforcement length for tarp ridges, side hems, doors, and beaks.
| Span | 1.5% shallow | 2.5% common | 3.5% deep | 4.5% max-use |
|---|---|---|---|---|
| 5 ft / 1.52 m | 0.9 in / 2.3 cm | 1.5 in / 3.8 cm | 2.1 in / 5.3 cm | 2.7 in / 6.9 cm |
| 8 ft / 2.44 m | 1.4 in / 3.7 cm | 2.4 in / 6.1 cm | 3.4 in / 8.5 cm | 4.3 in / 11.0 cm |
| 10 ft / 3.05 m | 1.8 in / 4.6 cm | 3.0 in / 7.6 cm | 4.2 in / 10.7 cm | 5.4 in / 13.7 cm |
| 12 ft / 3.66 m | 2.2 in / 5.5 cm | 3.6 in / 9.1 cm | 5.0 in / 12.8 cm | 6.5 in / 16.5 cm |
| 14 ft / 4.27 m | 2.5 in / 6.4 cm | 4.2 in / 10.7 cm | 5.9 in / 14.9 cm | 7.6 in / 19.2 cm |
| Edge role | Useful range | Why it changes | Pattern note |
|---|---|---|---|
| Long tarp side | 2.5-4.0% of span | Controls edge flutter and helps the panel pitch cleanly. | Use 7 or 9 stations for 8-12 ft edges. |
| Ridgeline seam | 1.2-2.8% of span | Too much curve steals headroom and complicates seam alignment. | Mirror both panels and keep the seam allowance consistent. |
| Door or beak | 2.0-3.4% of span | Shorter spans need enough shape to stop loose zipper edges. | Check overlap before trimming the second door. |
| End panel | 1.8-3.0% of span | Often has less unsupported distance than a long side edge. | Keep corner reinforcements outside the final curve. |
| Awning shade edge | 1.5-2.8% of span | Coverage matters; a mild curve tightens the front line. | Use shallow depth with strong corner patches. |
| Station count | Best span | Marking interval | Use case |
|---|---|---|---|
| 5 marks | Under 6 ft / 1.8 m | Every 25% of span | Door edges, beaks, repair panels. |
| 7 marks | 6-10 ft / 1.8-3.0 m | Every 16.7% of span | Most DIY tarp side hems. |
| 9 marks | 9-13 ft / 2.7-4.0 m | Every 12.5% of span | Large hammock tarps and long ridges. |
| 11 marks | Over 12 ft / 3.7 m | Every 10% of span | Group tarps, awning shades, long pattern boards. |
| Common project | Span | Fabric | Typical depth | Station choice |
|---|---|---|---|---|
| 11 ft hammock tarp side | 11 ft / 3.35 m | Silpoly | 3.3-4.2 in / 8.4-10.7 cm | 9 marks |
| Flat tarp ridgeline edge | 9 ft / 2.74 m | DCF | 1.3-2.0 in / 3.3-5.1 cm | 7 marks |
| Winter tarp side panel | 12 ft / 3.66 m | Silnylon | 4.5-6.0 in / 11.4-15.2 cm | 9 marks |
| Camper awning front edge | 13 ft / 3.96 m | PU polyester | 3.0-4.2 in / 7.6-10.7 cm | 11 marks |
| Beak door lower edge | 6 ft / 1.83 m | Silpoly | 1.6-2.3 in / 4.1-5.8 cm | 5 or 7 marks |
Straight-cut edges are why most home-made tarps is junk. A perfect line along an edge cuts off any grip and when that flat surface hits the wind, it’s turned into a sail, which in turn makes the entire panel into a sail, and then you’ve got a piece of cloth making a flappy mess of itself in 30 minutes time, which will drive your nuts. The fix? You might trip over some basic geometry if this is your first go at it. The answer is curves.
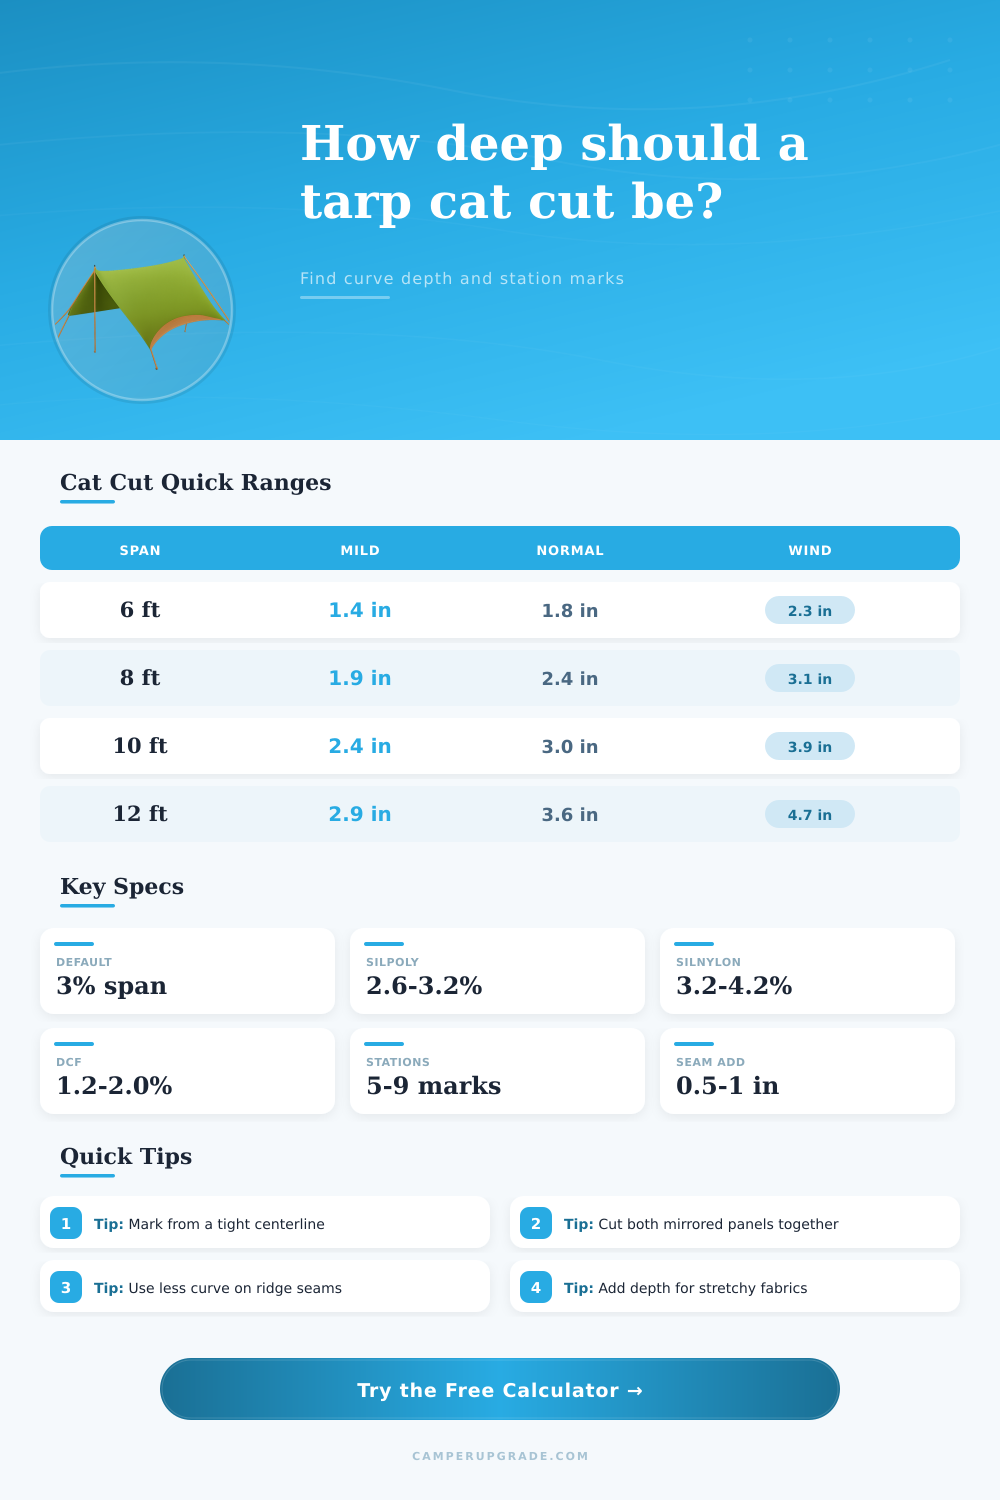
It is a catenary cut, which mimics how a rope naturaly sags when under tension. It lets the material lay flat against whatever it’s attached to and more importantly, eliminates the air pocket that creates flutter. That’s where your intuition typically goes wrong, the depth of that curve. To do all this work for you, simply put in your fabric type and desired span, and it spits out exact offset measurements (above).
How to Cut a Curve for Better Tarps
What’s cool is that it doesn’t output a single number, but a series of stations along the side of the panel. Why? Because trying to draw an even curve in one swoop with a ruler simply won’t happen on big pieces of material. Instead, we break up the curve into roughly 7-9 separate points (equally spaced from end-to-end), which becomes a clear guide for marking and then cutting.
It looks at what material you’re using (is it elastic-rich silnylon), or a more rigid composite Dyneema material? Depending on those factors, the math adjust to make sure you don’t cut too deep with a stiff fabric, but still have some wiggle room for the stretchier stuff. The biggest choice is probably which fabric and what behavior setting you select. Does the material get tighter or looser when wet? Do you need it to be loose enough to shed water (e.g. Silnylon) or do you want it snug but still shed (like Silpoly)?
If the former, then go with a deeper curve, if the latter, then something more modest is fine. This is why calculator suggests cutting deeper for stretchy fabrics: they relax when rained on or made damp. For example, if you use silnylon and cut a gentle curve, the minute the first drops fall from that storm, the edge will hang loose and collect water. In fact, it will form a trough and collect water, and there goes the tent.
It also looks at how the edge functions. A long side hem can have more curve, but a ridgeline seam doesn’t need as much curve. This is because extra drop on the ridge uses up some of the headroom inside the shelter. You want space to stand, not just tight fabric.
The number of stations are optional for many builders, but it has a direct impact on the final cut’s smoothness. On short edges such as beaks or door panels, five marks should of suffice. Fewer points won’t add any jaggedness because the curve is gentle. But for a side of a hammock tarp, say 12 feet long, jumping up to nine or eleven stations makes sure the arc flows naturaly. Avoid the dreaded scalloped look where straight segments between marks create a zigzag pattern.
This doesn’t just look bad; it also creates weak spots where stress builds up when wind gets high. If you don’t want to enter data into the input fields you can use the built-in reference tables which gives you the standard depth for common span lengths such as ten or twelve feet.
Surprisingly enough, weather exposure has quite a bit to do with all of this. Since there is little to no wind, you can set up your tarp with less tension and a flatter curve in a sheltered campsite. The calculator will adjust accordingly if you intend to hang this tarp on a beach front or other exposed terrain. Extra depth here offers more slack that you can cinch down with guy lines when necessary. It’s a margin of error against gusty winds that might otherwise rip at raw hems until they fail.
These aren’t set-in-stone rules, but rather starting points to your pattern board. Now we’re done Finally, draw on the fabric starting at that tight baseline to ensure accuracy of your center depth point. Then, plot out the rest of the stations. If possible cut both sides at once to be a perfect mirror so they mate up perfectly when sewn. Symmetry is what creates a pro looking shelter that holds up in the real world.
Not only do you get a cleaner edge but a better cut edge means less stress and noise for you. You get more time with the view and less time fiddling with your guylines in the dark. With every station mark, the curve protects you from the wind.