DC DC Charger Sizing Calculator
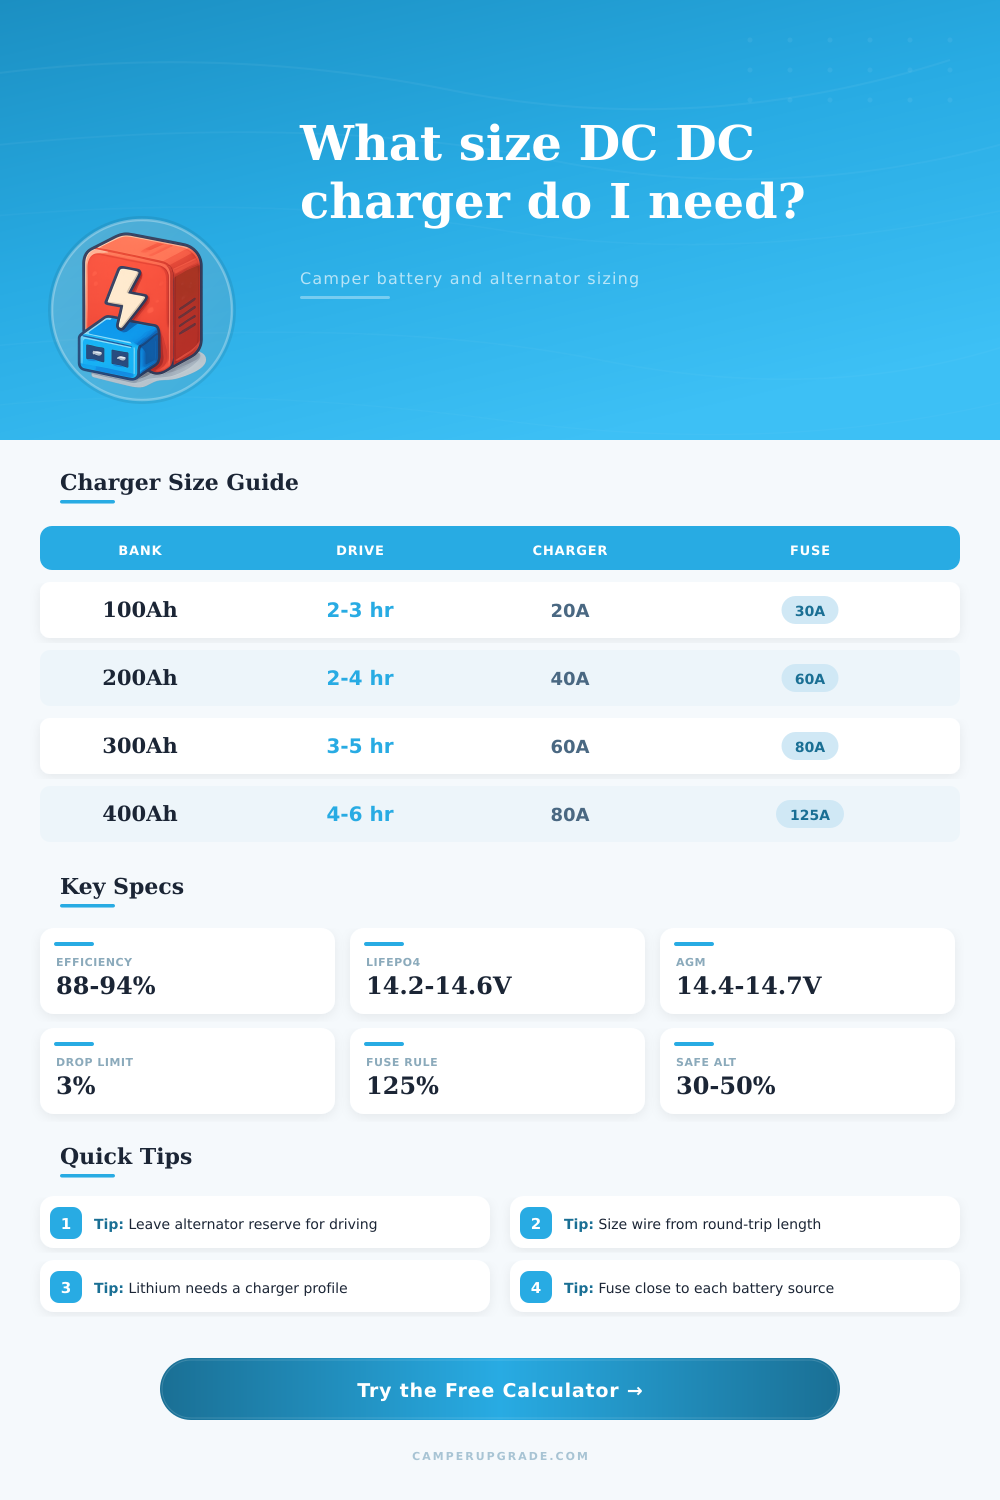
Size a camper DC-DC charger from battery bank capacity, state of charge target, drive time, alternator reserve, cable run, and charging profile.
Calculation Breakdown
| Battery bank | Typical charger | Best for | Notes |
|---|---|---|---|
| 75-120Ah | 20A | Compact camper, small AGM, single LiFePO4 | Gentle alternator load and easy wiring. |
| 120-180Ah | 30A | Weekend vans, fridge plus lights | Good balance for factory alternators. |
| 180-260Ah | 40A | 200Ah lithium camper systems | Common choice when drive time is 2-4 hours. |
| 260-350Ah | 50-60A | Large van loads and inverter use | Check alternator reserve and cable distance. |
| 350-500Ah | 60-80A | Extended travel and winter loads | Usually needs high-output alternator planning. |
| 500Ah+ | 80-100A+ | Motorhome or dual alternator charging | Use staged chargers or manufacturer limits. |
| Charger output | Fuse or breaker | Minimum cable near charger | Round-trip length note |
|---|---|---|---|
| 20A | 30A | 10 AWG copper | Short runs can pass; longer runs may need 8 AWG. |
| 30A | 40A | 8 AWG copper | Use 6 AWG for long van runs. |
| 40A | 60A | 6 AWG copper | Good practical baseline for 12-20 ft one-way. |
| 50A | 70A | 6 AWG copper | 4 AWG often fits lower voltage-drop targets. |
| 60A | 80A | 4 AWG copper | Common for larger lithium charging systems. |
| 80A | 125A | 2 AWG copper | Confirm charger terminal size and fuse holder rating. |
| 100A | 150A | 1/0 AWG copper | Often better split across multiple chargers. |
| Copper AWG | Approx resistance | Typical continuous range | Camper use note |
|---|---|---|---|
| 10 AWG | 1.00 ohm / 1000 ft | 20-30A | Short compact charger runs. |
| 8 AWG | 0.63 ohm / 1000 ft | 30-40A | Small vans with modest distance. |
| 6 AWG | 0.40 ohm / 1000 ft | 40-55A | Common 40A DC-DC installation size. |
| 4 AWG | 0.25 ohm / 1000 ft | 55-75A | Useful when starter battery is far forward. |
| 2 AWG | 0.16 ohm / 1000 ft | 75-100A | Large chargers and long wheelbase vans. |
| 1/0 AWG | 0.10 ohm / 1000 ft | 100-150A | High-current or dual charger feeds. |
| Battery type | Typical absorption | Float behavior | Sizing caution |
|---|---|---|---|
| LiFePO4 | 14.2-14.6V at 12V | Often low float or no float | Needs lithium profile and BMS temperature rules. |
| AGM | 14.4-14.7V at 12V | 13.5-13.8V | Charge acceptance tapers strongly near full. |
| Gel | 14.0-14.2V at 12V | 13.5-13.8V | Over-voltage can damage gel batteries. |
| Flooded | 14.6-14.8V at 12V | 13.4-13.6V | Ventilation and maintenance matter. |
It’s easy to forget about the alternator hiding in the front of your van, yet you drool over the shiny lithium batteries promising infinite range, so you purchase them first. You pay most attention to the house battery, forgetting that charging source is what really matters if you want those amps going where they’re needed.
That’s when you add a DC-DC charger; it fills the gap between variable voltages from your vehicle, converts it into steady safe energy for powering your loads at camp, but size it incorrectly and you turn your engine into a generator not a heat source. That’s where the math begins: how quickly do you need to top up, and how much capacity you want to have? Typicaly we’re looking at charging while traveling between stops or during a rest stop, meaning that you’ll have somewhere from two to four hours to get it done. So you’re topping up to replace whatever you used during the day, maybe eighty amp-hours if you drove hard; in that timeframe. A tiny trickle charger drawing only ten amps won’t even make a blip in the deficit; but then again, so what if you can only drive around for an hour and a half?
How to Choose the Right Size for Your DC-DC Charger
With the calculator above, all you have to plug in is the target charge (state of charge) and size of your battery bank, and it figures out math for you. That means no more guesswork about “is this a good charge rate?” The calculator uses your battery size to figure out how many amps you need so you don’t have to struggle with voltage conversion tables.
The other half of the equation is your alternator. Physics doesn’t care if your alternator output are limited. Most stock units puts out between one hundred fifty and two hundred amps at cruising speed. But they reduce substantialy at idle. And all your vehicle accessories pull off that same generator. So when you task the camper system with more than its fair share, your headlights will dim or check engine light may begin to flicker under a load.
The battery calculator takes into account your alternator rating and deducts an estimate for vehicle loads to determine a safe reserve window. That’s where many folks makes their mistake. They calculate based off what their battery can handle instead of what their engine can safely support. It reserves a safe margin (a cautious percentage) which keeps the whole system running healthy even when the weather heats up or traffic comes to a crawl.
Amperage isn’t everything either. As noted, voltage drop is another one of those silent efficiency killers. Cable runs matter too. Running small gauge wire more than a few feet to connect to a chassis mounted charger add resistance and converts power to heat before it even gets to your battery terminals. The chart on the page spells it out nicely and the point here is that gauge must step up quick with increasing distance. It doesn’t make sense to buy a high-output charger and then defeat the purpose by using cables that are too small, as you now lose twenty percent of your available energy to friction in the harness.
That investment is protected by proper fusing, which puts safety devices near both battery sources. These device ensure clean power all along the route and can prevent a short circuit from turning into an inferno.
The chemistry options rewrite all the rules. Batteries like lithium iron phosphate handles high current well right up to near-full charge (perfect for topping up quickly on a short trip). Other chemistries, such as AGM and gel, taper off rapidly nearing full state, so your big charger will spend much more time sitting uselessly when the battery reaches eighty percent. Top that thing out too far or don’t absorb enough, and you can do some real damage to pricey components. Match the charger to the battery’s charging profile. Or not. Warranties would of been voided quicker by skipping this step than by sloppy wiring.
Last but not least, balance is better then brute force. Oversizing any part cause as many issues as it solves. For example, a giant charger on an underpowered alternator are just going to cause headaches. Undersizing will leave your batteries empty by the end of the day, leaving you stuck somewhere with no power.
You need to find the sweet spot between having enough charging power to get to camp and respecting the limits of each power source. This way, you’ll turn the key in the morning with full bars and won’t worry about whether you overdid it yesterday. When you measure twice, size once and let the numbers do the talking instead of your gut that peace of mind is worth its weight in gold.