Panel Shading Loss Calculator
Estimate how much RV solar harvest is lost when roof vents, racks, antennas, trees, or awning edges shade part of a panel during useful sun hours.
🚙Real RV Solar Presets
⚙Array And Shade Inputs
🔋Material And Spec Comparison Grid
📊Reference: Shade Pattern Loss Multipliers
| Shade Pattern | Area Looks Small | Electrical Risk | Typical RV Source | Calculator Setting |
|---|---|---|---|---|
| Soft leaf shade | Often yes | Low to medium | Tree canopy near camp | Soft or moving shade |
| Hard square patch | Sometimes | Medium | Vent, skylight, roof box | Hard object shade |
| Thin crosswise stripe | Very small | High | Rack bar or antenna mast | Narrow stripe |
| Long-edge shadow | Moderate | Medium | Awning rail or roof lip | Along long edge |
| Corner patch | Small | Lower | Nearby hatch or branch tip | Corner patch |
🔧Reference: Wiring Layout Comparison
| Layout | Shade Behavior | Best Use | Tradeoff |
|---|---|---|---|
| Single series string | One shaded panel can pull down string current | Clear roof, long cable run | Highest shade coupling |
| Series-parallel | Shade mainly affects one string pair | Four-panel RV roofs | Mixed behavior by layout |
| All parallel | Shaded panel drags less of the array | Vent-heavy roofs | Higher current in roof wiring |
| Dual MPPT | Separate trackers isolate roof zones | Front and rear arrays | More controller inputs |
| Panel-level MPPT | Each panel tracks its own output | Portable or mixed-angle panels | More devices to mount |
📐Reference: Bypass Diode Zone Clipping
| Bypass Zones | Panel Fraction Per Zone | Small Stripe Impact | Common Panel Type |
|---|---|---|---|
| 2 zones | About 1/2 panel | Can be severe | Small or older modules |
| 3 zones | About 1/3 panel | Common clipping step | Many rigid panels |
| 4 zones | About 1/4 panel | Moderate clipping step | Some compact panels |
| 6 zones | About 1/6 panel | Better partial shade response | Half-cut split layouts |
💡Reference: Common RV Loads Compared To Lost Solar
| Lost Energy | 12 V Battery Equivalent | Example Load Offset | Trip Meaning |
|---|---|---|---|
| 100 Wh | About 8 Ah | LED lights for several hours | Small nuisance loss |
| 300 Wh | About 25 Ah | Compressor fridge for part day | Noticeable battery draw |
| 600 Wh | About 50 Ah | Fan, lights, water pump day | Plan charging carefully |
| 1000 Wh | About 83 Ah | Laptop work and fridge load | May require alternator help |
| 1500 Wh | About 125 Ah | Heavy boondocking day | Major array placement issue |
Sometimes less is worse. A big shadow hurt your power budget, and so does a little one. For example, a roof rack crossbar or an antenna mast cast a thin shadow that rapidy reduces your energy harvest. That’s because it doesn’t just sit on the side of one row of cells; it cuts across them. Whether you get light on the glass isn’t the problem. The problem is what happens with electricity flowing around the blocked spot.
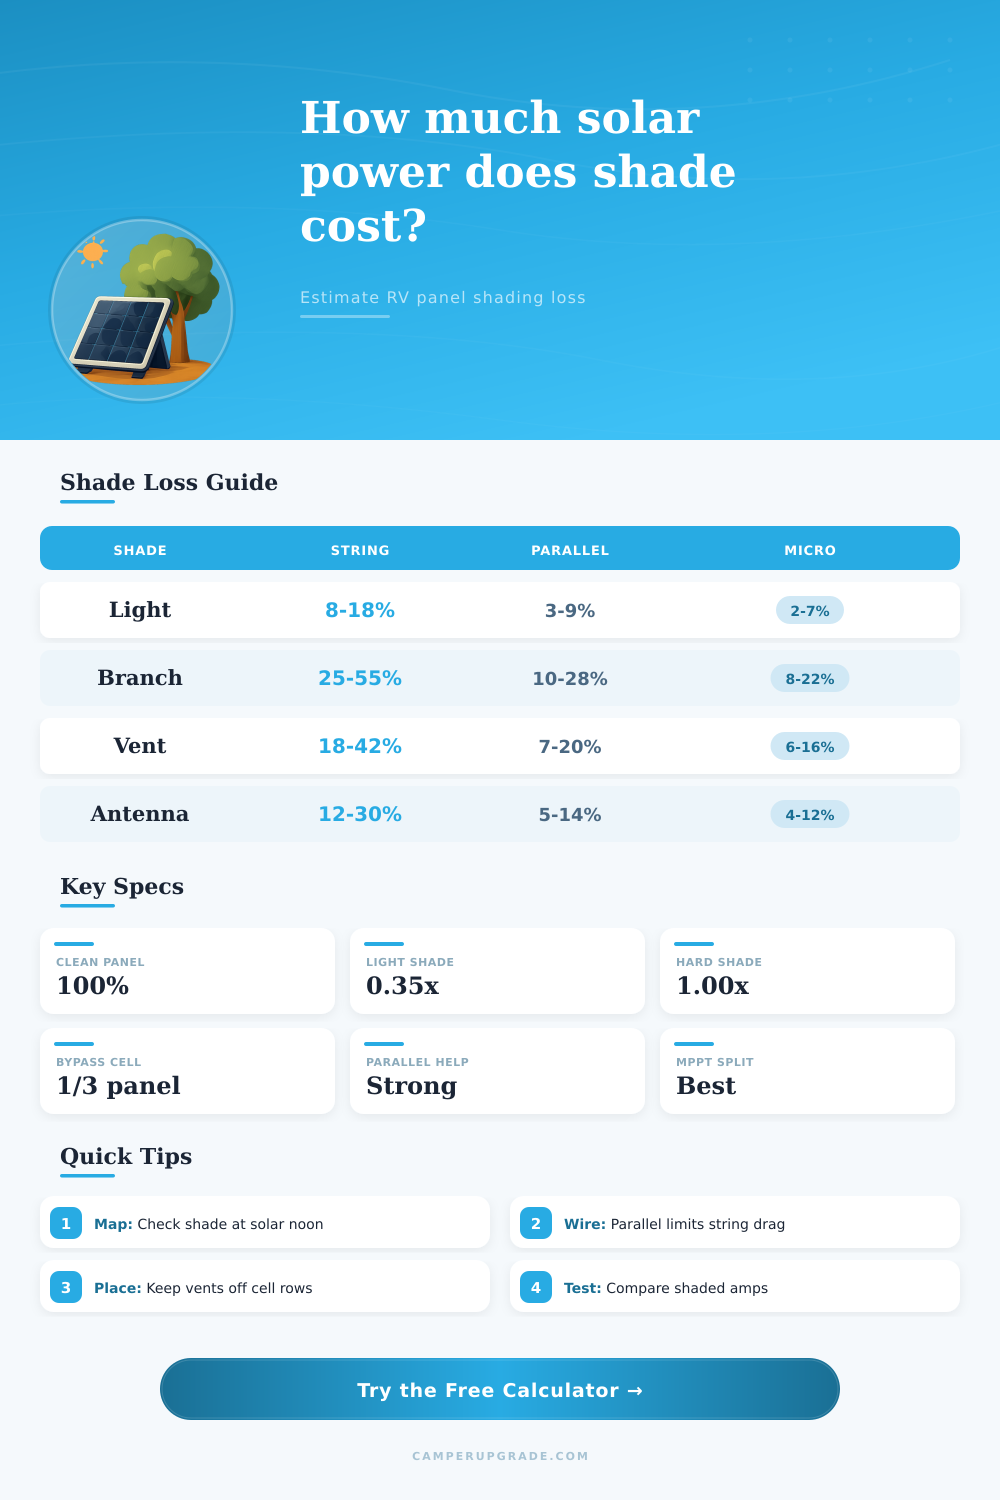
Most owners thinks mainly about watts and batteries. But they overlook wiring architecture that makes the difference between losing five percent of your daily charge versus losing fifty percent from a patch of shade. The math gets done by something called bypass diodes. These are kind of like little circuit breakers inside each panel, they allow the remaining cells to operate when some of them becomes shaded and go into resistance. Each diode will bypass a section or zone of cells in a series string. Standard panels has three zones. So when your shadow hits one zone edge, you immediately lose a third of the output from the entire panel. With half-cut cell panels, they splits it into six zones. That reduces the impact more significently.
How Shading Affects Your Solar Power
Knowing how this works avoids any surprises related to battery failure. Look at the reference grid on the page to understand how different wiring configurations deals with these penalties. It’s all about isolation. How does one panel failure affect the rest? It’s all about wiring topology. Each panel is only as good as its weakest link in a single series string. The current are limited by shade on the first panel for the whole line. Prefer parallel wiring or separate MPPT inputs for roofs covered with fixtures and vents. Splitting the system limits the damage. If a panel is shaded in one branch it doesn’t throttle the clear ones in another. This architectural decision has far more impact than simply adding an extra hundred watts of raw capacity. It converts a catastrophic drop to a manageable reduction.
The calculator above runs the numbers for your exact setup. It converts those electrical behaviors to actual watt-hours lost per day. The other thing folks forget about is timing. Two hours of midday shade may be worth more then some morning shade blocking out the sun. Even though it’s the same amount. Sunlight is most productive when it’s highest in the day. So lost shade around those middle daylight hours mean more loss to your overall yield.
Another factor is how hard is that shade? Oftentimes dappled shade like leaves provides better performance different than something with a crisp edge like an air conditioner unit. It doesn’t hit so many cells in a single area or engage the bypass diode. Instead the system just operates at lower levels without completely shutting down a whole section.
The solution to this for many owners is to reposition their panels. That works, as long as you haven’t got a lot of other stuff on the roof of an RV. There aren’t a lot of good locations. And occasionally, less isn’t more; it’s where you position what you’ve got. Can’t move the vent? Try rearranging the wires. Can’t rearrange the wires? Accept the cost and design your battery bank around it. It is a choice between efficiency and convenience.
Ultimately, some inefficiencies are unavoidable if you don’t want to get up on the roof each morning to tweak your panels. This isn’t about getting it perfect. It’s about understanding the price tag so that you can build your power plan without assuming the weather will always cooperate. When you find out how many watt-hours of juice you’re really burning through, you can change how you use them. You could of also charge them from an alternator or generator if needed.
If we know that this setup burns three hundred watt-hours, then we’ll know how many battery we need in parallel, and we won’t be surprised that it gets dark before we get to turn on the lights. It’s no longer a black box. It is a thing with unknowns. It becomes something you can measure, something that fits within your overall energy budget. That gives you confidence. You start understanding your own system. And you realize the sun is going to rise and set, but how it affects you depends more on how you wired things than on its position overhead.