MTB Tire Pressure Tubeless Calculator
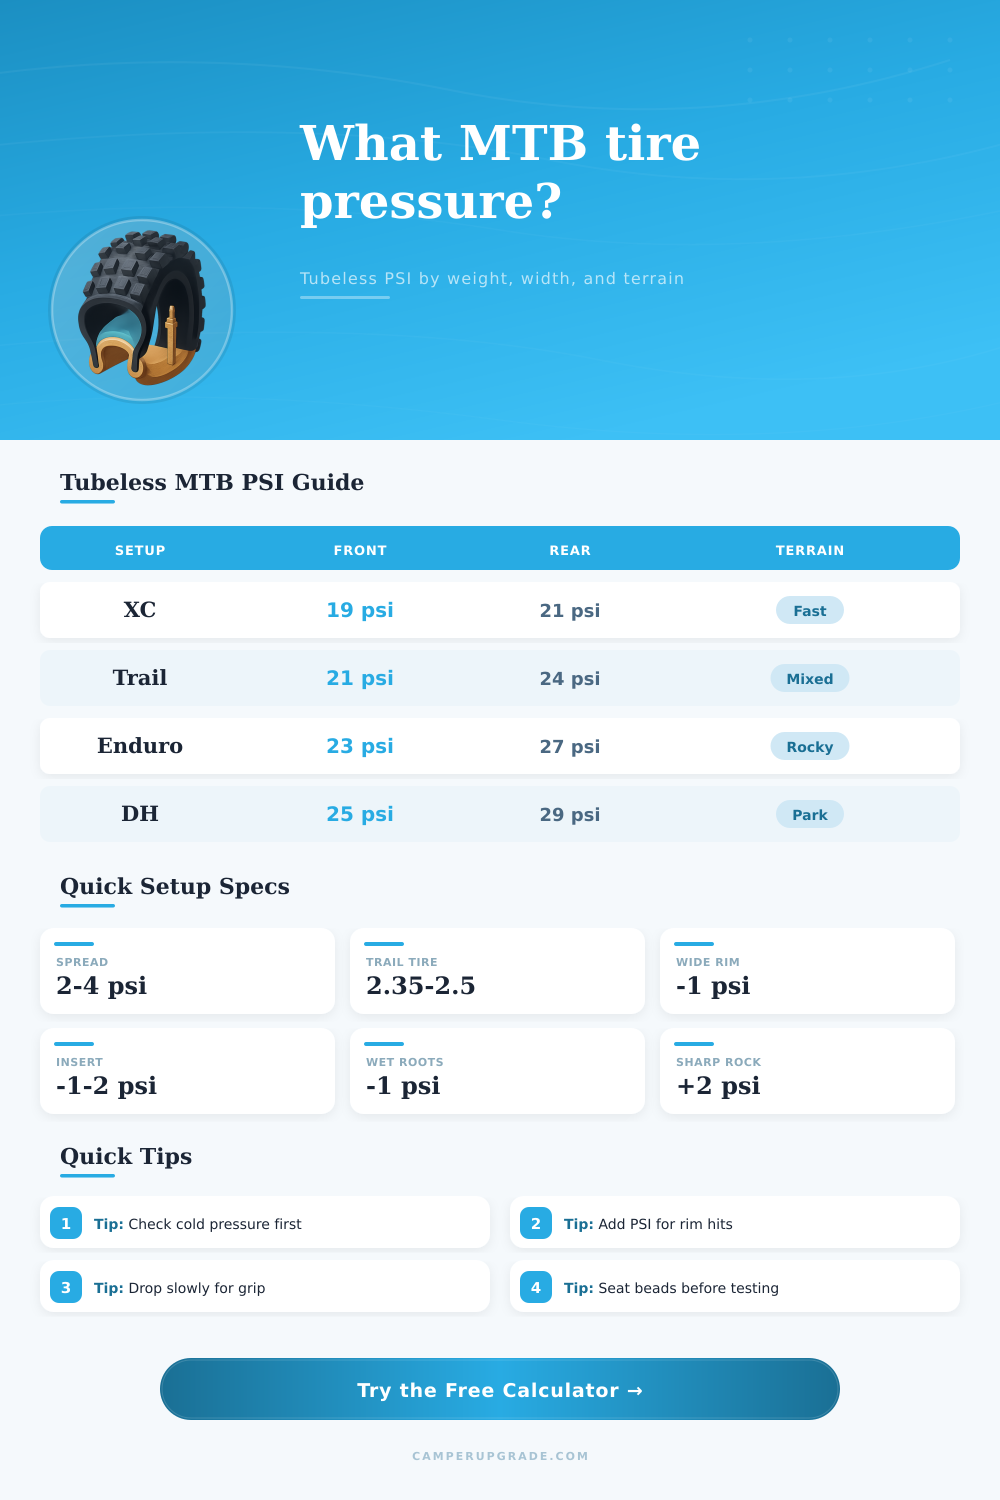
Estimate tubeless mountain bike tire pressure from system weight, tire width, wheel size, casing, rim width, inserts, terrain, riding speed, and front-to-rear load split.
🚵Tubeless MTB Presets
Your Tubeless MTB Tire Pressure Snapshot
⚙Rider, Tire, And Trail Inputs
🛞Casing And Insert Spec Grid
🔧Material And Spec Comparison Grid
XC / Light Casing
Best for: racing, smooth trails, low rolling weight. Keep PSI higher to avoid sidewall cuts and rim taps.
Trail Casing
Best for: everyday tubeless setups. It balances grip, support, rolling feel, and repairability.
Reinforced Casing
Best for: enduro speed and rocky descents. Stronger sidewalls help the tire hold shape at lower pressure.
Insert Setup
Best for: rim protection and lower-pressure grip. Start only 1 to 2 PSI lower, then test carefully.
📊Tubeless Pressure Reference Tables
| Tire width | Typical use | Pressure effect | Setup note |
|---|---|---|---|
| 2.1 to 2.25 in | XC race or fast hardpack | Add 2 to 4 PSI | Narrow air chamber needs more support. |
| 2.3 to 2.45 in | Trail and light enduro | Baseline range | Most modern trail setups start here. |
| 2.5 to 2.6 in | Enduro, grip front tires | Subtract 1 to 2 PSI | Extra casing volume improves impact cushion. |
| 2.8 to 3.0 in | Plus bike or snow-free soft trail | Subtract 4 to 7 PSI | Use wider rims to prevent tire roll. |
| Trail surface | Front change | Rear change | Reason |
|---|---|---|---|
| Smooth hardpack | 0 PSI | 0 PSI | Fast surface with low rim-strike risk. |
| Wet roots or slick rock | -1.5 PSI | -1 PSI | More front grip and casing contact patch. |
| Chunky rocks | +1 PSI | +2 PSI | Rear wheel takes more square-edge hits. |
| Sharp desert rock | +2 PSI | +3 PSI | Cut and rim protection matter more than softness. |
| Bike park braking bumps | +1.5 PSI | +2.5 PSI | High-speed repeated impacts heat and flex the tire. |
| Casing or insert | Front effect | Rear effect | Best use |
|---|---|---|---|
| Light XC casing | +1 PSI | +2 PSI | Smooth races and low tire weight. |
| Trail casing | 0 PSI | 0 PSI | Default for mixed singletrack. |
| Reinforced casing | -1 PSI | -1 PSI | Enduro and rocky trail riding. |
| Firm rear insert | 0 PSI | -1.5 PSI | Lower rear PSI with rim protection. |
| Firm pair of inserts | -1 PSI | -2 PSI | Bike park or hard-charging setup. |
| Rider style | Pressure move | What to watch | Trail test |
|---|---|---|---|
| Light and smooth | -1 PSI | Tire fold in fast turns | Add pressure if steering feels vague. |
| Balanced trail pace | 0 PSI | Even grip and support | Use as the first test lap baseline. |
| Aggressive cornering | +1 PSI | Sidewall squirm | Push into berms and off-camber turns. |
| Race pace impacts | +2 PSI | Rim taps and burps | Check pressure after the first descent. |
| Loaded bikepacking | +2 to +4 PSI | Rear tire heat and flex | Recheck after loaded climbing. |
💡Tubeless Setup Tips
Tubeless mountain bike tire pressure are finicky. Too little and you’ll blow out spokes, lose sealant, and possibly strike rims. Too much and the tire skip over rocks instead of absorbing them, making for a rough ride. Tubeless pressure values supplied by the calculator is made for your rig. But knowing the reasons behind them will keep you fast and safe.
Tire pressure equals gravity plus traction plus structure. The pressure is affected by your body weight, but also weight of your bike. Most folks don’t consider that their gear weighs something. On steep climbs, that extra weight put more load on the rear axle. Without accounting for the gear, the rear tire will be running softer then necessary. This results in a greater rim-to-rock risk when encountering nasty rock patches.
Why Tubeless Tire Pressure Matters
You can enter your gear weight separately from your rider mass into the tool. This creates a more accurat starting point for how much force is being applied to the contact patch. Tire casings matter as well. Cross-country tires is typically lightweight. Their sides don’t stand up well to heavy loads. To stay in shape, they require more air pressure.
Enduro tires are usually heavier duty with double-ply sides and reinforced beads. These tires become almost a rigid shell. At lower air pressures, these tires can absorbs folding. The casing hold its shape. It’s why one rider might run twenty psi in one bike and thirty-five in another. It is not because it’s a good idea, but because that’s what physics and engineering dictate.
Pressure choices are largely dictated by tire width. Width plays a huge role here. A wider tire has more internal volume. Less pressure are needed to get the same amount of cushioning. More air room equals more forgiveness. Run two-point-six inches wide and you can go lower psi than you can with a two-inch tire. Narrow tires and low pressure cause disaster for your sidewall.
Change your pressure based off the terrain. For wet roots, you want as much of that surface area gripping. Decrease pressure slightly so it can shape itself to irregular surfaces. For sharp desert rocks, go firm. That protects your rim against impact and keeps tire away from cuts. With two opposing goals (traction versus protection), you’re stuck with a compromise. Most will split the difference. A bit less grip is a small price to pay for not blowing your tires down a hill.
What about inserts? Inserts change the pressure equation. Riding a flat is not an option with inserts. They supports the tread when the sidewalls give way. You can run safe low pressures because your inserts support the tire. If you’ve got inserts, the calculator recommends dropping just a pound or two. A little decrease provides increased comfort off road. The ability for the tire to flex and then meet the stop point of the insert offers a gain in comfort which decreases tiredness during extended trips.
Tire pressure can change dramatically with temperature. Friction and braking heat the tire and cause the air inside to expand. What was a perfectly inflated tire at takeoff could now be overinflated after ripping down a hill. Check your tires while they are still cold. Then warm them up and recheck. That’s how you realy tune it. Too much air? The ride will feel rough/harsh, skipping across smooth terrain. Too little? The ride will become vague in steering and the tire will wobble.
Is it a perfect number? No. It is a comfort zone within confidence bounds. Use the starting numbers provided by the calculator. Adjust gradually. Make only one change (front or back) per ride. This allows for finding which feels best. When you’ve dialed-in the right mix of support and grip, note those numbers on your phone or on your pump. Get to know your conditions and you’ll dial-in your own sweet spot. You should of known that.