Alpine Climbing Rack Calculator
Estimate a clean, balanced alpine rack for granite splitters, ridges, mixed lines, and snowy approaches.
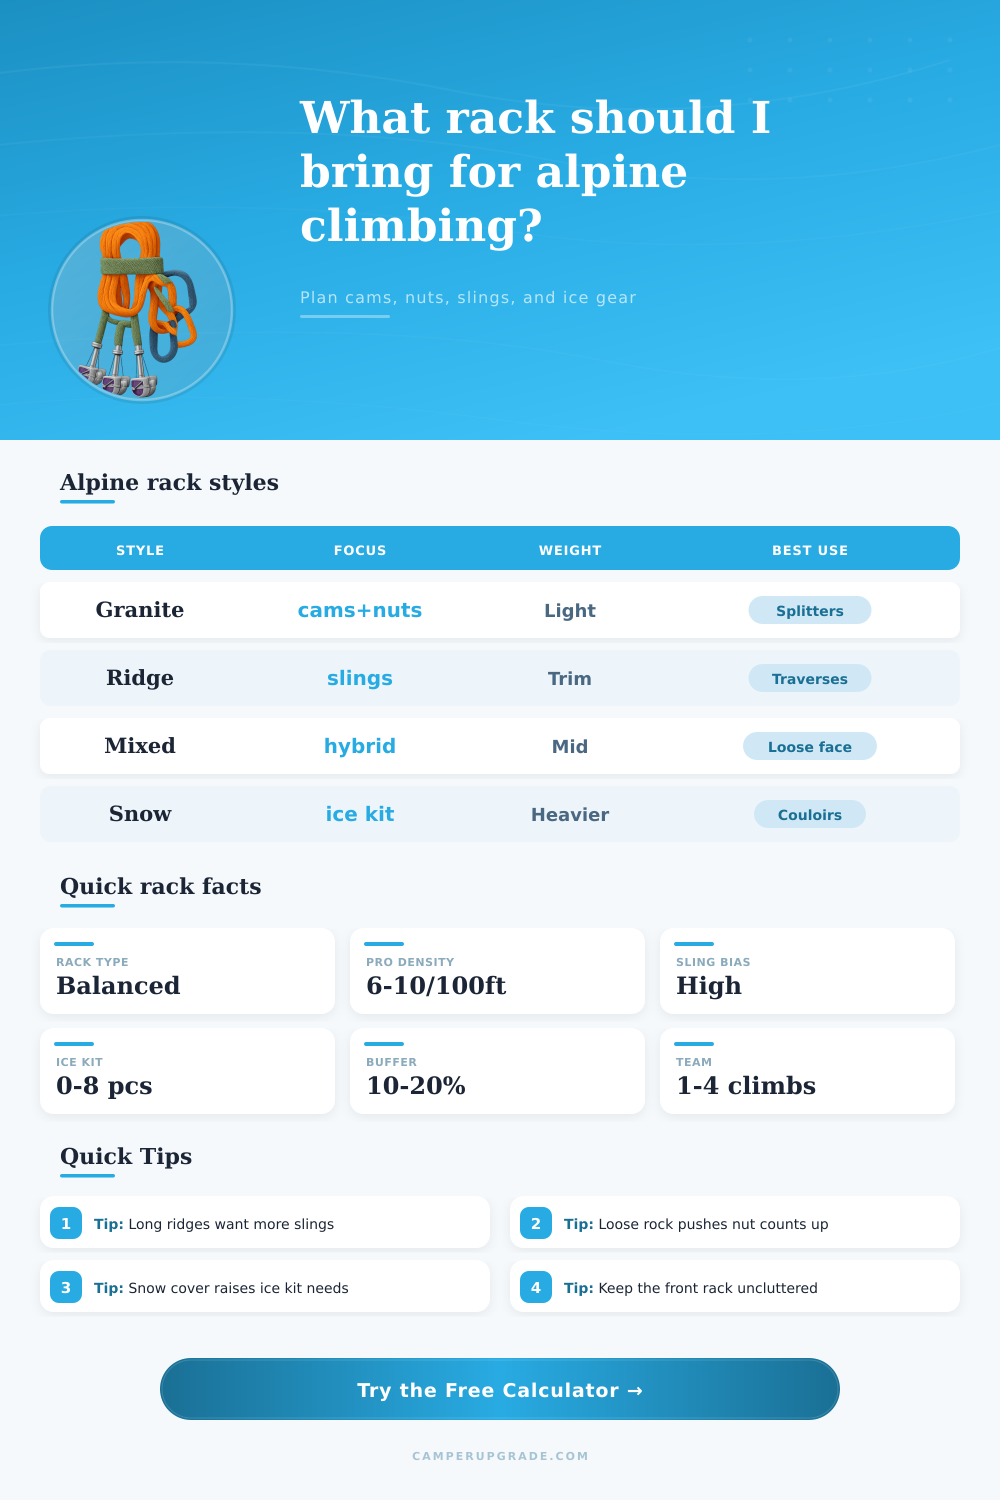
How the model works: the calculator blends route length, pitch count, terrain quality, crack frequency, snow cover, team size, and a rack discipline buffer to estimate a practical carry list instead of a one-size-fits-all gear pile.
| Style | Density | Bias | Use case |
|---|
| Terrain | Cams | Nuts | Note |
|---|
| Item | Weight | Pack role | Tip |
|---|
| Preset | Length | Rack feel | What it favors |
|---|
Keep the front rack tidy: place the most-used cams and quick-access slings where you can reach them without searching at hanging stances.
Use longer slings on ridges: wandering alpine lines benefit from extra extension, especially when the route trends around blocks or horns.
Let loose terrain increase nuts: broken rock often rewards more passive protection, and the calculator nudges the rack in that direction automatically.
Snow changes everything: even a small amount of snow or ice can shift the rack toward screws, pickets, and extra anchor hardware.
An alpine rack is a group of climbing equipment that an individual should carry with them when ascending mountain. An alpine rack must be carefuly planned. Too much weight isnt ideal for ascending mountains quick.
However, too little weight is also not ideal because there wont be enough equipment to provide protection for the mountains that needs to be climbed. The specifications of the route is what will determine the alpine rack that is used. The number of pitches and the length of each pitch will be considered when planning an alpine rack.
How to Plan an Alpine Rack
Additionally, the frequency of crack on the mountains will determine the number of pieces of climbing protection equipment that will be needed. Finally, if the mountains contain snow or ice, then ice screw and snow pickets will be needed in the alpine rack. The type of terrain will determine the type of gear that is needed in the alpine rack.
If the terrain contains clean granite cracks, then climber will use cam. The lobes of the cams will grip the granite walls. However, if the terrain is made of loose rock, nuts will be used instead of cams.
Nuts are lighter in weight than cams and are easier to place into the cracks of the mountain. The level of commitment and the size of the alpine team will also play a role in determining what will be included in the alpine rack. For instance, if an alpine rack consists of a single climber for a day trip, there will be less equipment.
However, if it is a larger alpine team for a longer expedition, there will be more equipment. If an alpine expedition will occur overnight, then there will be more cordelette and more locking carabiners. A larger alpine team will have to shares gear and create more anchor than a smaller alpine team.
The number of placements of gear per hundred feet of alpine climb will determine the number of pieces of each type of gear that will be in the alpine rack. For example, there could be separate group for small cams, medium cams, large cams, nuts, alpine draws, long slings, and ice tools. The total weight of the gear is another essential factor in determining what gear will be in the alpine rack.
The total weight of the alpine gear will affect the climbing alpine team’s movement. If the alpine team consists of two individuals, and they will be climbing mountains for an overnight trip, the total weight of the alpine rack should of be approximately five pounds. However, if the rock on the mountains is loose or there is snow on the mountains, the alpine rack will have to weigh more.
Common mistake should be avoided when preparing an alpine rack. For instance, do not ignore rope drag. Instead, use long slings to your placements to extend the alpine rack around the corners in the mountain.
Another mistake is allowing the weight of the alpine gear to become too high. Because cams are very heavy, only carry the amount needed for the size of the crack in the mountains that will be climbed. An extra buffer of gear should be prepared in case of the unexpected.
A buffer of ten to twenty percent of the total gear in the alpine rack will provide enough room in case that an alpine team has broken gear while on the mountain or if they must take a detour on the alpine trip. Additionally, recent trip report can be checked to see if the condition of the mountains have changed. For alpine trips, it is necessary to read the trip reports to see if the mountains have snow on them or if there is loose rock on the mountains that need to be ascended.
Finally, the alpine team should test the alpine rack prior to the alpine team begins their climb. Lay the gear on the ground and weigh it. Ensure that it is manageable when it is packed in the alpine teams backpack along with their climbing rope and clothing.
By planning the alpine team’s alpine rack in this manner, they will ensure that they have the proper amount of gear for the alpine mountains that they will climb and the right amount of weight for the alpine team to climb the mountains.